

This post contains affiliate links and/or codes, so if you purchase a product through such a link or with such a code, I may receive a small commission at no extra cost to you.
I continue to publish free chapters from the book “Photographer’s Guide to Capture One 12”.
“Photographer’s Guide to Capture One 12” is a comprehensive guide to Capture One, which works just perfectly if you wish to become familiar with all the Capture One tools or to fill in some gaps in your understanding of how Capture One works.
Last week I’ve published a chapter about Levels – “Optimizing the Contrast with Levels”
A free chapter for this week is “Removing noise with Noise Reduction” where you’ll find a bunch of hints on finding the best noise reduction settings for your images.
In the full book, you will find 60 chapters (over 460 pages) of similar quality with more than 750 screenshots.
Plus, you can get a 10% discount for “Photographer’s Guide to Capture One 12”! Just enter this code Alex4 at the checkout and you’ll immediately get the discount.
Removing noise with Noise Reduction
Capture One Pro can remove both the luminance and color noise from your images with the Noise Reduction tool. Note that some color noise reduction is applied automatically to raw files because there almost always is some base color noise present in a raw file even at low ISO values.
All cameras have their own customized noise reduction that is optimized for each ISO value by the team behind Capture One Pro. This means that the hard work is already done, and Capture One Pro will provide you with a tailored noise reduction that can be fine-tuned further if need be.
There is one important thing to be aware of when you work with the Noise Reduction tool. As you will note, both the Luminance and Color noise reduction sliders are by default set to 50, but this does not mean that a heavy dose of noise reduction is applied, or that all images receive the same amount of noise reduction.
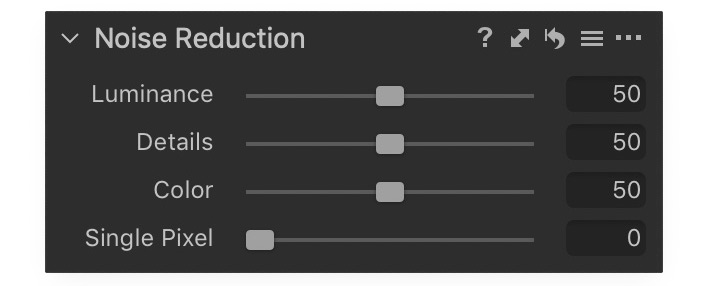
You should instead think of the sliders as a way to control the balance between preserving detail and reducing noise. When at 50, it merely means that this is what Phase One regards as the best balance. You can increase the amount of noise reduction by setting the Luminance and Color sliders higher than 50 or decrease the amount by setting them lower than 50.
The Details slider works in conjunction with the Luminance noise reduction amount and lets you increase micro-detail at the expense of more noise when you move it above 50, while you can smooth out the noise at the cost of detail with a value below 50.
Removing hot pixels with Single Pixel
The Noise Reduction tool also has a very nice feature called Single Pixel. With this slider, you can remove those nasty, hot pixels that often show up on long exposures, especially during the night.
You should be aware that Phase One might have added some Single Pixel noise reduction by default to help get rid of some of that fine-grained “salt and pepper” pixel noise.
Finding the best noise reduction amount
You should always tweak the noise reduction when you are looking the image at 100%. The Focus tool can be a nice help to quickly check different parts of the image.
It is impossible to recommend certain values to use with the Luminance, Detail and Color sliders because this depends on the noise level in the image, the quality of the light and your preference. In most cases, you will probably find that the default Color noise reduction works great.
The only thing you need to pay attention to is that the colors can be blurred too much and lose definition if you set a high amount, like 100.
The hardest part about removing noise is to strike the right balance between applying a nice luminance noise reduction and still retain the details. Instead of just increasing the Luminance slider to the max to get rid of the grain, you might want to reduce Detail the same amount as you increase the Luminance so that the values would be Luminance 70 and Detail 30 as an example.
If you still struggle with getting rid of the noise, there is a couple of additional tricks you can use.
You can increase the Threshold value in the Sharpening tool to make sure fewer details get sharpening applied, and you can use a negative value with the Structure slider in the Clarity slider.
Finally, if you have trouble with a lot of noise on an even surface like the sky, the Skin Tone tab in the Color Editor tool has a marvelously Uniformity feature that evens out the tones and thus mitigates the noise. This trick will be covered later in this chapter.
Both the Structure and Skin Tone trick are probably best applied on a layer with the Layers tool because you can then limit their effect with a mask.
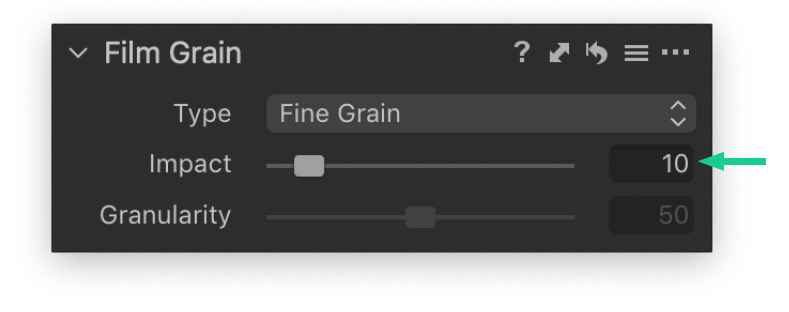
You should be aware that Capture One Pro might automatically add some simulated grain with the Film Grain tool to help get a more natural noise look at higher ISO values. If you find that this adds more grain that you like, remember to set the Impact slider back to 0 (zero) in the Film Grain tool.
Get the full version of the Photographer’s Guide to Capture One 12 and learn about these additional features that are covered in the Noise Reduction chapter:
- Saving as a Preset
- Copy and reuse an adjustment
- Save your changes as defaults
- Making Localized Adjustments on a Layer
The eBook is available in both the ePub, PDF and Mobi (for Kindle) file formats which are included in the single purchase.
Get 10% OFF Photographer’s Guide to Capture One 12
How to Get the Discount?
1. Go to the store to buy the book.
2. At the checkout, enter this code ALEXONRAW and you’ll immediately get 10% off.
Capture One Hidden Features eBook

Capture One Hidden Features is a collection of more than 200 pro hints to improve your Capture One workflow, structured into an easy-to-read book.
You can download four chapters from the Capture One Hidden Features ebook free of charge:
- 3. Must-Have Shortcuts
- 14. Hidden Features of Layers
- 27. The Power of Mask Inversion
- 38. Automation with Macros
Simply subscribe to the AlexOnRAW newsletter by entering your email in the form below. After subscribing to the newsletter, you’ll immediately receive the four chapters from the book. Also, you’ll regularly get a friendly newsletter with free Capture One tutorials, image editing tips and tricks, and news from Capture One community.