


Today Phase One released Capture One 12 with a mass of long-awaited features.
The new Capture One 12 brings Luma Range Masking, Radial gradient (finally!!), reworked Linear gradient and publishing Plug-ins.
Plus:
- The new interface
- Fujifilm Film Simulation
- A number of user experience improvements (my favorite one – copy/apply adjustments can now ignore cropping!)
Ok, begin downloading Capture One 12, grab something nice to drink and get yourself comfortable. We’re heading to inspect Capture One Pro 12’s new features in all their detailed glory!
1. The New Interface
Capture One developers called the new interface “super flat” and yes, can confirm, it’s flat. Kind of super, if you wish. Most importantly – it feels remarkably good, a bit unhabitual at first, but things are always changing, you know.
The idea behind the new interface is to make Capture One easier to use over long editing sessions and that’s a great goal for sure. I have spent dozens of hours in Capture One 12 beta and the new UI felt nice and comfortable.
What I really love, is that font sizes and cursors have been made larger; it’s a thing I have longed for.
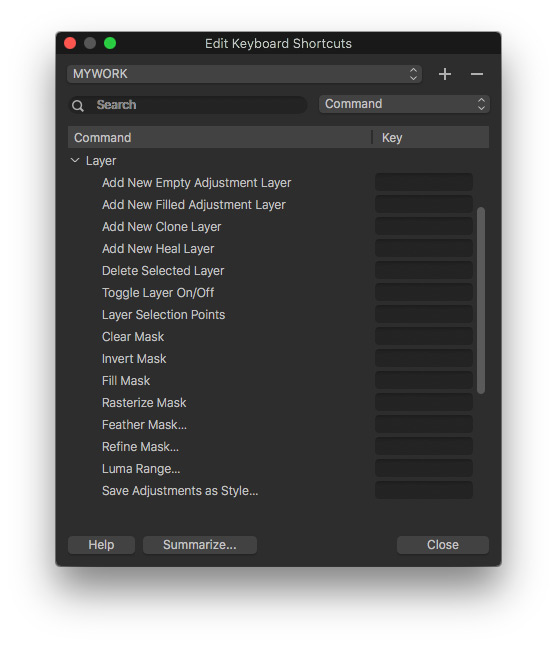
Another significant update of Capture One 12 interface is the new upper Menu System. The menu was completely reorganized, Mac users will be surprised to find “Edit Keyboard Shortcuts” in the Edit tab now.
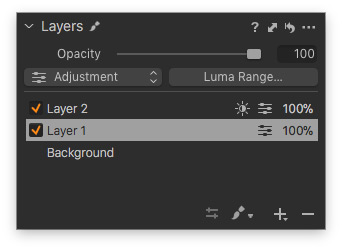
In general, it has become easier to navigate the menu as well as to find a specific option. Plus, developers have added two new sections, Layer and Select, for a quick access to these features.

Layers tool has also been a bit redesigned, now you can quickly change the type of selected layer: Adjustment, Clone or Heal.
Ok, enough about design, let’s head to the editing. Did I hear somebody mention “Radial gradient” here?
2. New Gradients
2.1. Radial Gradient
A radial gradient is a feature which Capture One users have been asking for for years. I suppose the real reason of adding Radial Gradient in Capture One Pro 12 is a growing army of former Lightroom users who are bombing Capture One forums and tech support with messages like:
“Hey, hey, what a lovely app you have here, folks! Wait for a second, where is the radial gradient??”
Ok now, Radial Gradient is finally here and it’s awesome!
Radial Gradient is really useful when you need to quickly draw a smooth mask and to leave some area untouched.
For example, here I have created a radial mask on a model:

Now I can add some adjustments to the mask or apply one of the new Portrait Styles.

You can control gradient smoothness by moving the internal circle of the radial mask. And if you wish to change the shape of the gradient, just hold the Alt and move one of the anchor points.
By default, the radial gradient is filled outside, but you can easily toggle filling by clicking a right mouse button and choosing Draw Mask Inside.

Note, that you need to draw a new mask to apply settings, this option doesn’t invert the existing gradient. To invert the gradient, you can just use “Invert Mask” feature.
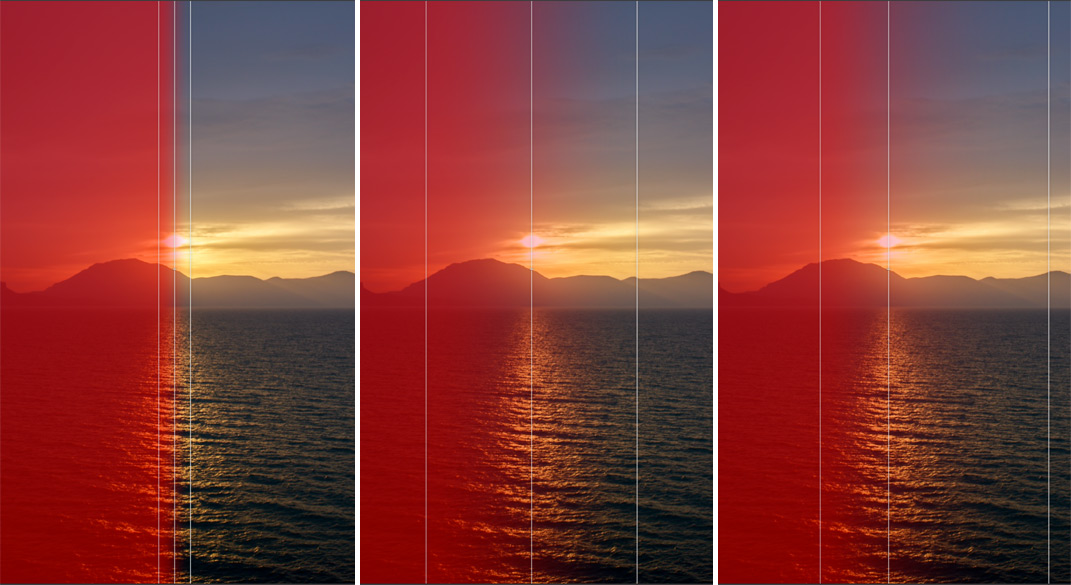
2.2. Reworked Linear Gradient
The classic Linear gradient was significantly reworked in Capture One 12.
Now you draw a Linear gradient using the new three-lines-tool:

By changing the position of lines, you can scale and rotate gradient:
To gain a full control over the new Linear gradient, use these simple tricks:
- To change a gradient smoothness
-
- – hold down Shift and move lines
-
- To move lines separately – hold down Alt and move lines
-
- To rotate a gradient by 45-degree angle – hold down Shift and rotate the radial gradient
- To relocate a gradient – hold down CMD (Ctrl in Windows) and drag a mask
If you have been working in Capture One for years, reworked Linear gradient might look a bit uncustomary. But that’s just a necessary improvement.
The new Linear gradient works faster, better and more intuitive, especially for former Lightroom users.
2.3. Rasterize Mask Feature
When I just started working with the new gradients, I thought:
“Looks awesome, but how do I edit the drawn gradient? What if I wish to erase part of the gradient or to refine the gradient?”
Don’t worry, it’s all here. You still can modify gradients as regular masks.
The only difference is that in Capture One 12 you firstly need to rasterize the gradient mask.

Basically, by rasterizing the gradient, you create a regular mask which can be edited and refined.
To rasterize mask just right click on the layer with gradient and choose Rasterize Mask.
Here I have created a gradient and refined it to fit the image more accurately.
Also, I highly recommend you to assign a shortcut for Rasterize Mask as well as for Refine Mask, Invert Mask and other basic Layer actions.
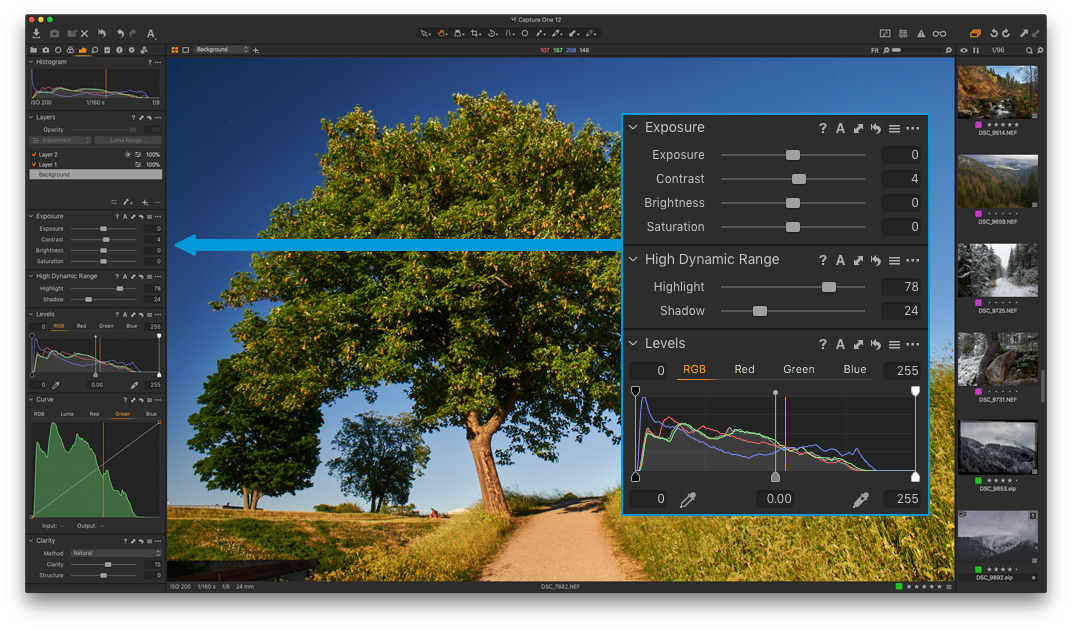
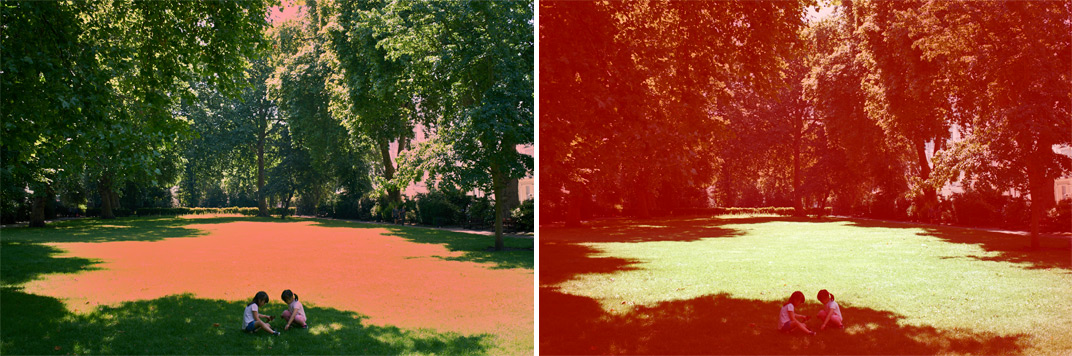
3. Luma Range Masking
Luma Range Masking is another great novelty of Capture One 12. It allows you to create a mask based on selected brightness values.
To start working with Luma Range mask, you need to draw a mask or just create a new filled layer. The point is that Luma Range Mask doesn’t create a new mask, but transforms the one which already exists.
Let’s see how it works. Say, you want to darken windows on this building:
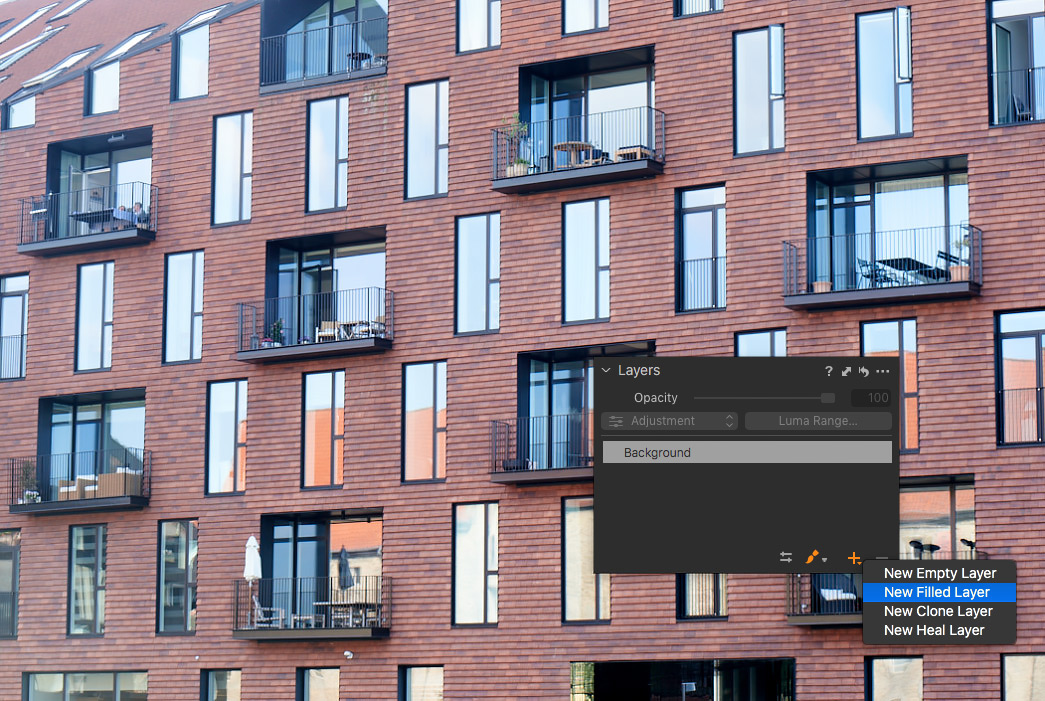
First of all, you need to create a new filled layer. You can draw any other mask as well, but since we need to apply Luma Range to the whole image, it’s easier to start with a new filled layer.
To work with Luma Range masking, select a layer and click Luma Range button; you can also assign a shortcut for this.
Now, this is Luma Range mask settings:
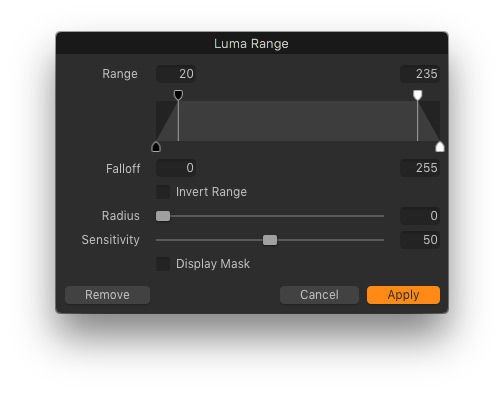
Here you determine how Luma Range tool transforms your current mask.
By moving the sliders, you can set the brightness of pixels which will be included in the mask. Top black and white sliders restrict the mask to the specific brightness range. Bottom sliders are responsible for Falloff – a useful tool to control mask opacity transitions.

You can also correct the accuracy of the mask with Radius and Sensitivity sliders or invert the selected range by clicking Invert Range.
For this image, I’ve masked only highlighted areas and quickly applied some Exposure, Levels, and Color Balance corrections.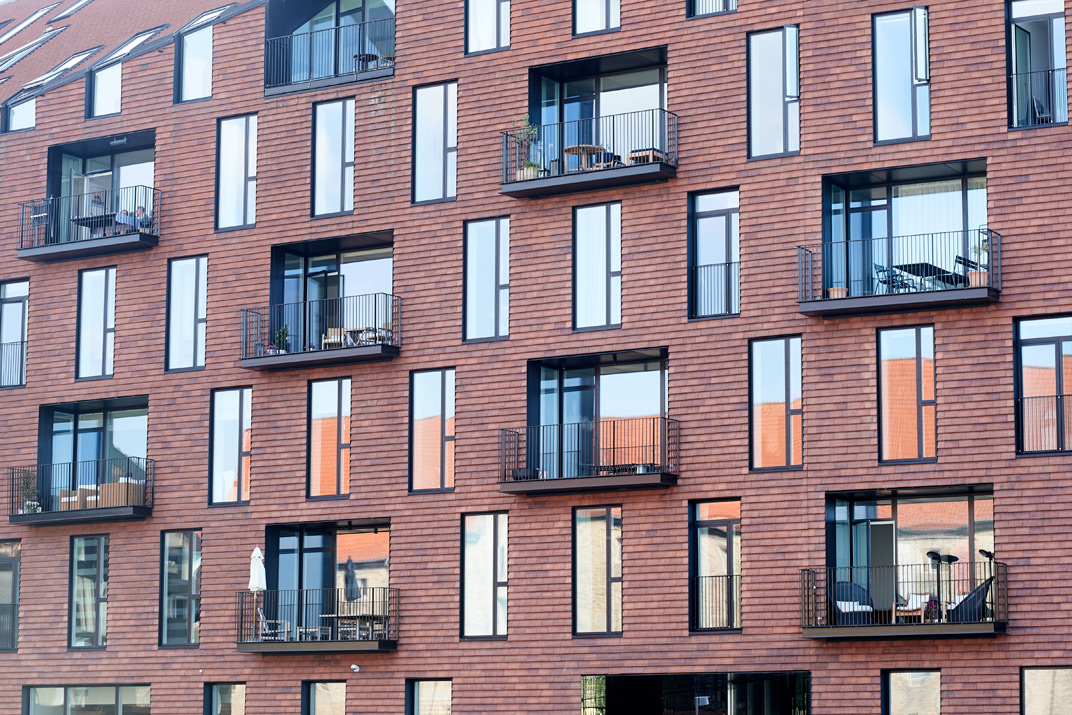

Luma Range works perfectly when you need to mask specifically dark or bright areas on your image.

Using Luma Range Masking, you can easily recover sky in your landscape:

Looks great, but let’s find some real challenge for Luma Range Masking.
How about balancing highlighted areas and shadows on this image:

First of all, we’re creating a Luma mask for highlighted areas and refining it. Now we need a mask for shadows, the easiest way to create it is to copy mask from the first layer and invert it.
Then we’re applying some basic exposure adjustments to both layers and adding a bit of Levels and color correction magic and… here we go!


And you know what? That’s not all the features of Luma Range!
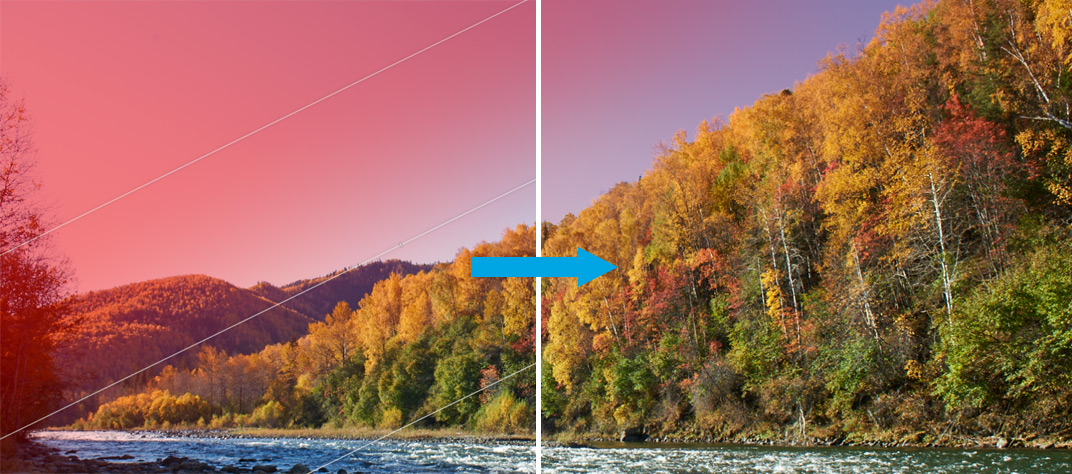
There is a thing which just blew my mind when I released it:
Luma Range re-invents Levels correction!
Yes-yes! Just answer me: what is the biggest issue with Levels correction?
Right! You have to be really careful with Levels, otherwise, you will lose data!
Like this image; I’ve applied a strong Levels correction, everything looks good, but I’ve lost lots of information in shadows.

Now check this out!
The only thing you need to do is to apply Levels to a filled layer and remove dark areas from Luma Range! This way Luma Range automatically restricts Levels tool from affecting deep shadows.

Now, we have got a perfectly balanced image with great color and detailed shadows.
Ok, Capture One 12, now I’m really impressed!
BTW, don’t forget to upgrade you file engine in Base Characteristics. Otherwise, you would not be able to use all the features of Capture One 12.

4. Publishing Plug-ins
The next big thing in Capture One 12 is the new Plug-in platform.
Capture One community was eagerly awaiting Plug-in support all these recent years and now we can see the first changes here.
Capture One 12 offers Publishing Plug-ins, which allow you to publish your images to different services right from Capture One.
At the release, Capture One 12 supports the following services:
- FORMAT
- HeliconSoft
- JPEGmini
To use Publishing Plug-ins you need to right click on an image, chose Publish and select Get Plugins. You’ll be redirected to a page at PhaseOne.com, where you’ll find all the available plugins.

Of course, we all wish to see some other types of plugins: for retouching or HDR creation. But I think that’s just a first step and there will be more new plugins available in the future.
As of now, here you can find the Capture One SKD and start creating your own plugins!
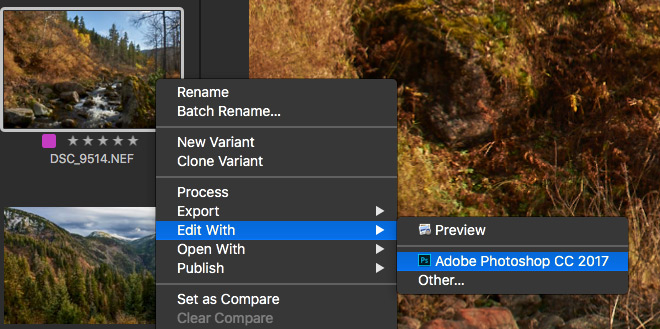
BTW, if you regularly use round-trip editing, in Capture One 12, Edit With and Open With tools have also been reworked. Now they support any applications and you just need to select one to add it to the quick access list.
Ok, let’s move on to some great news for Fuji cameras owners:
5. Fujifilm Film Simulations
Yes! In Capture One 12 you can now apply the famous Fujifilm Film Simulations!
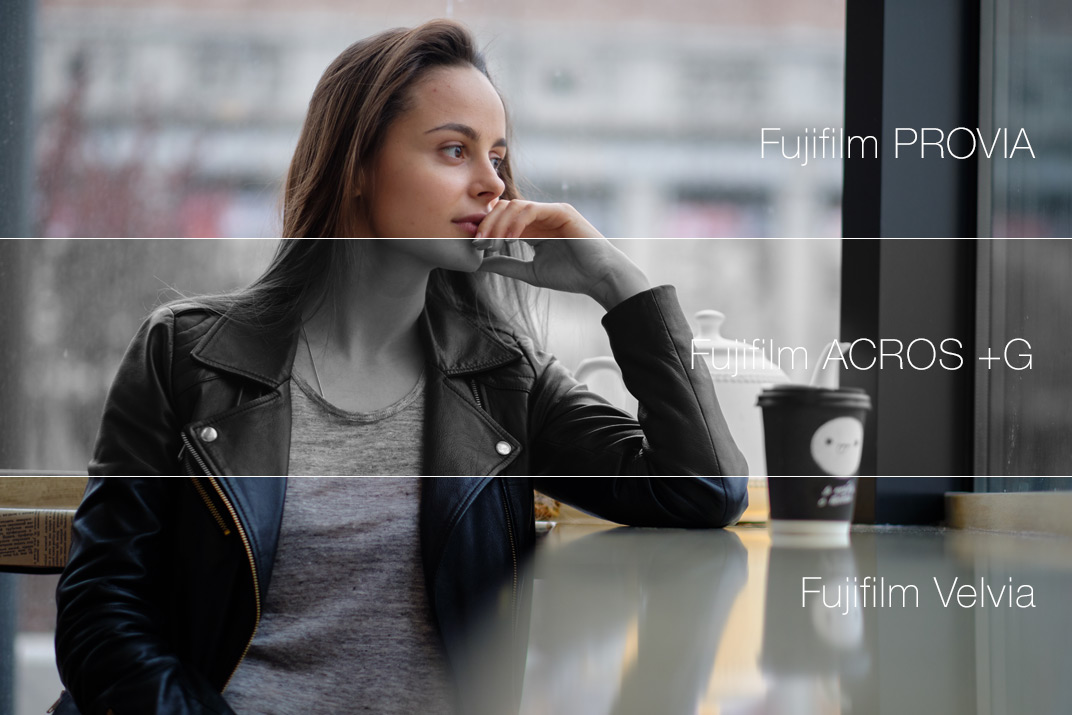
To apply Fujifilm Film Simulations, you need to go to the Base Characteristics tool and change Base Curve. Here you will find all the classical Film Simulations:

At the moment, Film Simulations are available only for these Fujifilm cameras: X100F, X-E3, X-T2, X-T3, X-T20, X- Pro2, X-H1 and GFX 50S / 50R.
But I hope Phase One will add support for other cameras in the future upgrades as well.
As expected, you can’t use Film Simulations with non-Fuji RAWs, even if you would assign Fuji camera profile.
Another important specific of Capture One engine is that Base Characteristics tool doesn’t support layers, so there is no way to apply Film Simulations locally as well.
At the same time, such an approach has a significant advantage over styles/presets. Base Curve is not an “adjustment”, it doesn’t use any tools in Capture One. That’s why you have a complete freedom of editing your images.
Fujifilm Film Simulations are available in all the versions of Capture One, including Fujifilm Express, Fujifilm Pro and a regular Pro.
If you’re not familiar with Capture One Fujifilm, I’ve prepared for you a detailed guide, where you will find all the information on this special offer for Fujifilm photographers.
6. Useful Improvements
6.1. Copy/Apply Composition
Previously, cropping and other composition settings were automatically copied during copying/applying of image adjustments. That was a real headache for batch editing!
There were some ways to turn it off, but all of them were not really convenient.
In Capture One 12 you can set a custom preference for this. Just go to Adjustments Clipboard, click “…” icon and chose Autoselect -> Adjusted except Composition.

6.2. New Keyboard Shortcut Manager
Capture One allows you to customize almost all the shortcuts and I highly recommend you to do so.
In Capture One 12 developers have restructured the Keyboard Shortcut Manager and added a search bar for faster navigation in the hotkey list.

Mac users – don’t forget that the Keyboard Shortcut Manager is now located in the Edit tab!
6.3. Extended AppleScript support
In Capture One 12 developers updated a list of tools which are supported for AppleScript:
- Normalize tool
- Locate
- Set/clear/get compare variant
- Overlay
- Workspaces
- Black and White
- Live View focus meters
- Styles on Layers
- Readouts
- Upgrade Engine
- Capture Pilot Server
- Process history
- Native activities
- Collection sort order
- UUID for all objects
7. New Supported Cameras
As well as with long hoped-for features, Capture One 12 brings long-awaited support for some new cameras:
- Nikon Z7
- Nikon Z6
- Canon EOS R
- Canon EOS M50
- Fujifilm GFX 50R
8. Capture One 12 Prices
Capture One Pro 12 prices are:
Perpetual license – 286 EUR
Subscription – starting from 180 EUR/year
Upgrade from Capture One Pro <9/10/11 – starting from 130 EUR
Capture One Pro Sony/Fujifilm 12 prices are:
Perpetual license – 204 EUR
Subscription – starting from 155 EUR/year
Pro Sony/Fujifilm licenses can also be upgraded – starting from 106 EUR
Express versions
For Sony and Fujifilm camera owners, Capture One offers free Express versions.
It has all the basic functionality for RAW editing and is absolutely free.
Just download it and start working. No activation is required.
9. In the End
Capture One 12 is one of the user-friendliest upgrades of Capture One ever.
Developers implemented lots of long-awaited features for loyal Capture One users and reworked some classical tools to make them more understandable for the new to Capture One photographers.
I think Phase One is heading the right way. Capture One needs to fight for a market share by attracting new users. At the same time, developers never forget about photographers who have remained with them for years.

Author – Alexander Svet
Alexander Svet – professional photographer and specialist in image processing.
Phase One Certified Professional and Capture One trainer.
AlexOnRAW.com