

Phase One introduced LAB readouts in Capture One 11, but as I can see, not many photographers actually implemented this feature in their workflows.
I suppose the reason for this lays in the “weirdness” of LAB values comparing them to much more habitual RGB color space. At the same time, LAB colors are device independent, hence mastering LAB can benefit you a lot in professional color management and advanced image editing.
Here, I’ll not go into a detailed explanation of how LAB works, you can easily google it yourself.
The basic concept is pretty simple. LAB contains three channels: L stands for Lightness and contains luminance information only, A and B channels define colors. A channel contains data about greens and magentas, B channel about yellows and blues.
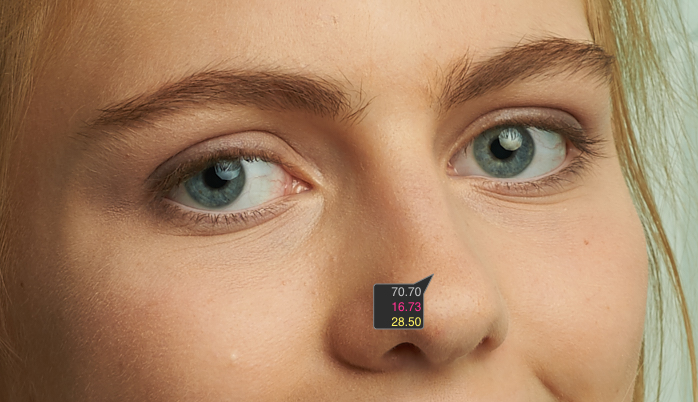
So, let’s figure out how to read LAB values in Capture One on an example of this portrait:

Disclaimer:
The values I offer here are quite approximate and you should not build your editing solely on them. You can use these values to verify your editing, however, you should never rely on them alone. Professional editing requires a calibrated monitor, correct and stable surrounding light, plus an experienced “vision” for color correction.
LAB Readout Modes
First of all, you need to choose the right LAB readout mode.

- If you’re proofing and processing your image with Adobe RGB or ProPhoto RGB profiles select Adobe (generic) mode.
- For sRGB profile, choose Adobe (neutral) mode.
Measuring Lightness
That’s the easiest part. For Caucasian skin tones, your lightness values should be around 60-80. These are approximate numbers, they might vary for a pale person or a tanned one.

Measuring Saturation
Now, we need to figure out what is happening with the saturation of the skin tone. Is it unsaturated? Is it oversaturated?
There is no strict reference, but in most cases (for Caucasians), you should look for values around 20-30 in A and B channels. However, 15-20 or 30-40 might fit some portraits as well.
Measuring Tint
Here you can use this rule:
The value of the B channel should be 10-20% more than the value of the A channel. Thus, if your A channel value is 20, you should look for B value around 22 or 24.

If this difference will be any more pronounced, you will see a noticeable change in your skin tone.
Keep in mind that this is just numbers. There are no “good” or “bad” numbers. Either there are numbers which fit your task or not. For instance, it’s okay to have a warm and magenta skin tone if you need it.

LAB readouts are not about finding the “ideal” skin tone. It’s about finding the right skin tone for your task.
If you master LAB readouts, you will always get the skin tone you need for your image.
Speaking of LAB, I wish to remind you that Capture One has a magnificent tool called Luma curve. It allows you to change image brightness without affecting saturation. Therefore, it works quite similarly to L (Lightness) channel in LAB.
Using LAB readouts, you can clearly see how this works. The original LAB values here fit perfectly the classical color correction approach: 60 lightness, A = 20, B = 24 (20% more than A and both lay in 20-30 range).

Now, I’ll create two clone variants of this image.
To the first variant, I’m going to apply RGB curve adjustments to increase image contrast.
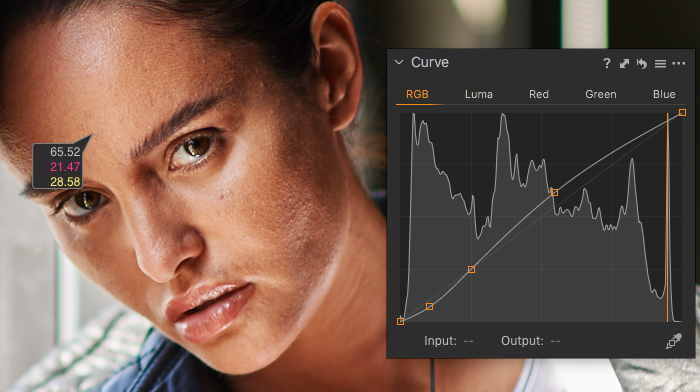
To the second variant, I’m going to apply the identical Luma curve adjustments.

Let’s compare the numbers:

As you can see, both corrections have almost the same lightness values, but the RGB curve has affected the B channel (yellows and blues) much more strongly than Luma correction.
Luma curve has almost no impact on color and that’s why you can use it to enhance your portraits without ruining skin tones.
Capture One Hidden Features eBook

Capture One Hidden Features is a collection of more than 200 pro hints to improve your Capture One workflow, structured into an easy-to-read book.
You can download four chapters from the Capture One Hidden Features ebook free of charge:
- 3. Must-Have Shortcuts
- 14. Hidden Features of Layers
- 27. The Power of Mask Inversion
- 38. Automation with Macros
Simply subscribe to the AlexOnRAW newsletter by entering your email in the form below. After subscribing to the newsletter, you’ll immediately receive the four chapters from the book. Also, you’ll regularly get a friendly newsletter with free Capture One tutorials, image editing tips and tricks, and news from Capture One community.