Facebook Twitter Instagram
    Trending
    • Five Ideas for Style Shortcuts in Capture One
    • Fixing Your Capture One Issues Part II
    • Capture One 23 16.2 Overview – Auto Dust Removal, Face Focus, Styles Shortcuts
    • Fixing Your Capture One Issues
    • Five Ideas for Your Capture One Workspace
    • Skin Tone Correction in Capture One with Styles
    • Unlock Lightning-Fast Editing in Capture One
    • Writing Capture One Scripts Using the New ChatGPT GPT-4 Model
    Facebook Twitter Instagram
    AlexOnRAW Your guide to Capture One
    • News
    • Articles
    • Plugins
    • Contacts
    • Styles
      • NEW! FILM STYLES FOR CAPTURE ONE
      • Pro Color Grading Styles
      • Ultimate Capture One Toolkit
    • Capture One Hidden Features eBook
    • NEW COURSE! AI-POWERED IMAGE EDITING FOR PHOTOGRAPHERS
    AlexOnRAW Your guide to Capture One
    Home»Articles»How to Turn Off Fujifilm Film Simulation in Capture One 12?
    Articles

    How to Turn Off Fujifilm Film Simulation in Capture One 12?

    Alexander SvetBy Alexander SvetFebruary 7, 2019
    Facebook Twitter Email LinkedIn WhatsApp Reddit Tumblr
    Share
    Facebook Twitter LinkedIn Email Telegram WhatsApp

    What happened with my Fujifilm RAWs in Capture One 12?

    After Capture One 12 has been released, I hear this question quite regularly.
    Some Fuji photographers noticed that their Fuji RAWs look different now in Capture One 12 and they can’t understand what actually happened.

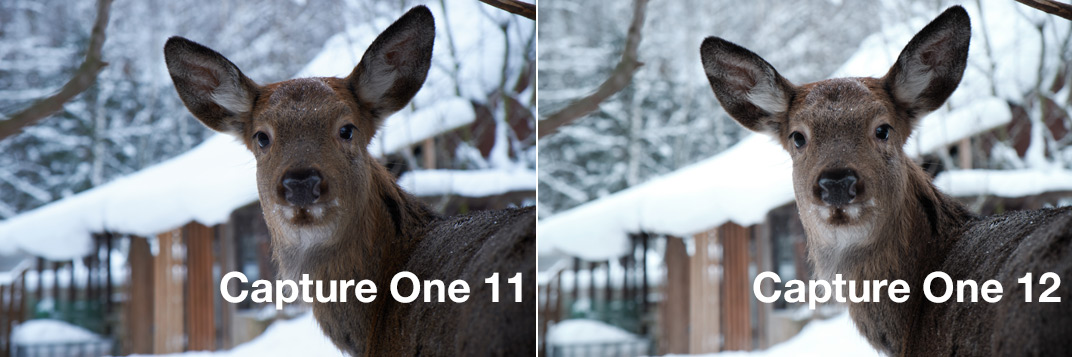
    The reason for this matter is the new Fujifilm Film Simulation feature which uses Base Curve to apply a film profile.

    By default, the Base Curve is set to the Auto mode in Capture One.

    Now, here is the thing:
    In Capture One 11 and older versions, the Auto mode always chose regular Film Standard as the Base Curve.
    But in Capture One 12 the Auto mode works differently for Fuji RAWs. It automatically applies the same Film Simulation Curve to RAW, which has been selected in your camera.

    In general, this is pretty logical and convenient, but the problem is that the Base Curve is always listed as “Auto” and you have no idea which Film Simulation Curve is actually applied. Thus photographers notice some color changes compared to Capture One 11, but they can’t find a reason for them.

    The solution here is rather simple. Choose the Film Standard Curve for your image, click “…” icon on Base Characteristic tool and select “Save as Default…”

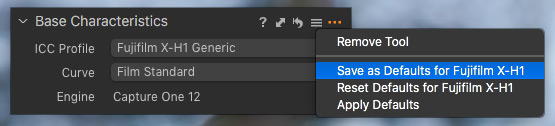
    Now, Capture One will automatically set Base Curve to Film Standard for all the new RAWs from this camera, and you’ll always see the natural RAW colors.

    Also, I’ve already sent feedback to Phase One, that this issue could be fixed merely by displaying the applied Film Simulation Curve instead of the Auto Curve.

    Capture One Fujifilm
    Share. Facebook Twitter Pinterest LinkedIn Tumblr Telegram Email
    Alexander Svet

    Alexander Svet – Professional photographer and photography instructor. Phase One Certified Professional and Capture One beta tester.

    Related Posts

    Five Ideas for Style Shortcuts in Capture One

    June 1, 2023

    Fixing Your Capture One Issues Part II

    May 26, 2023

    Capture One 23 16.2 Overview – Auto Dust Removal, Face Focus, Styles Shortcuts

    June 1, 2023

    Follow @AlexOnRAW

    Tweets by @AlexOnRAW
    Recent Posts
    • Five Ideas for Style Shortcuts in Capture One
    • Fixing Your Capture One Issues Part II
    • Capture One 23 16.2 Overview – Auto Dust Removal, Face Focus, Styles Shortcuts
    • Fixing Your Capture One Issues
    • Five Ideas for Your Capture One Workspace
    Copyright 2023 Afterimages OÜ
    Reg. nr. 16195804
    Address: Estonia, Harju maakond, Tallinn, Kesklinna linnaosa, Tornimäe tn 7-26, 10145
    Customer service email: [email protected]
    Privacy policy  Refund policy  EULA

    Type above and press Enter to search. Press Esc to cancel.