


Today Phase One released Capture One Pro 11.
When I started writing this overview, I was thinking of some usual intro like “Each Capture One release delivers a New Big Feature, and this year it’s… blah-blah-blah”.
Screw it. Let’s get down to business.
Capture One Pro 11 is something totally new. Today Phase One re-invented RAW processing and undermined all the competitors on the market.
Now, let’s discuss how Capture One 11 plans to redesign your workflow completely.
Get 200+ Film Styles for Capture One

- Boost your workflow with 200+ film styles
- Save your time and get new ideas for color correction
- Approved by thousands of photographers worldwide
Learn more and download 12 sample styles for free!
Capture One 11 in 10 minutes
By the way, there is a nice bonus waiting for you at the end of the article!
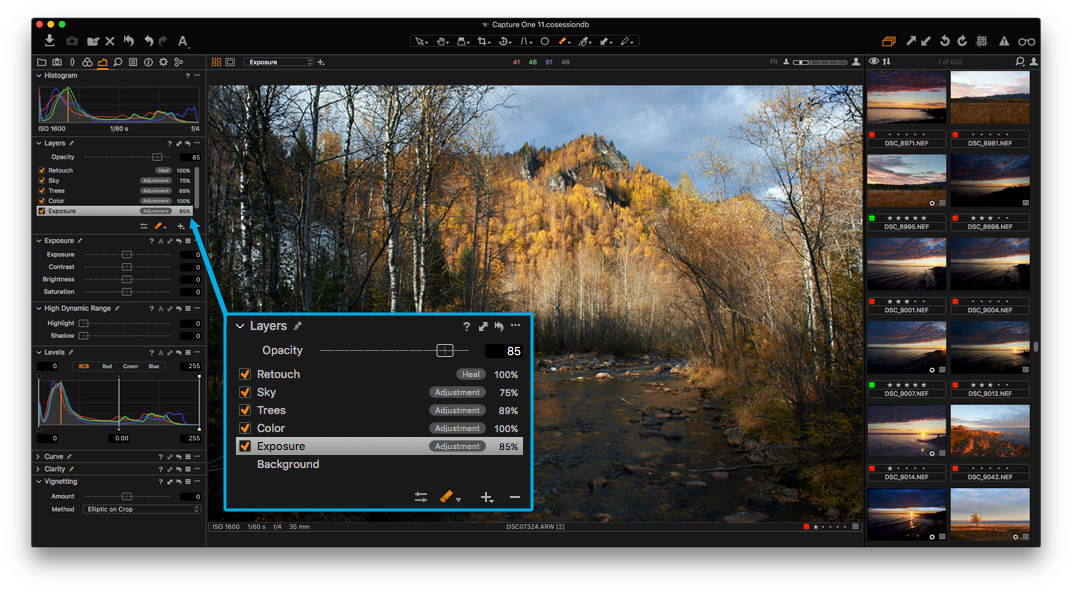
Layers Are Everything Now
Capture One Pro 11 is all about layers.
Layers now have Opacity. Styles & Presets work with layers, Color Balance and Levels tools are also available for layers.

In hindsight, you might notice that Capture One was developing a layer-oriented processing in the recent years. But only with Capture One Pro 11 release, we can see where it led to. Since I ran the first beta of Capture One 11, I’m still a little bit shocked at how new layers changed the way I work with RAW. But the first thing you would notice is the new interface.
New Interface
First of all, in Capture One 11 you won’t find Local Adjustments tool tab at all.
It’s gone because in the eleventh version there are only few tools NOT available for Layers: Black & White, Vignetting and Film Grain. All the other essential tools work with layers, including Levels and Color Balance. That’s right – in Capture One Pro 11 you can basically do all the editing in layers.
Local Adjustments tool is now called simply Layers, and it’s located in Exposure, Color and Details tool tabs by default, but you can always duplicate it and place it anywhere you want.
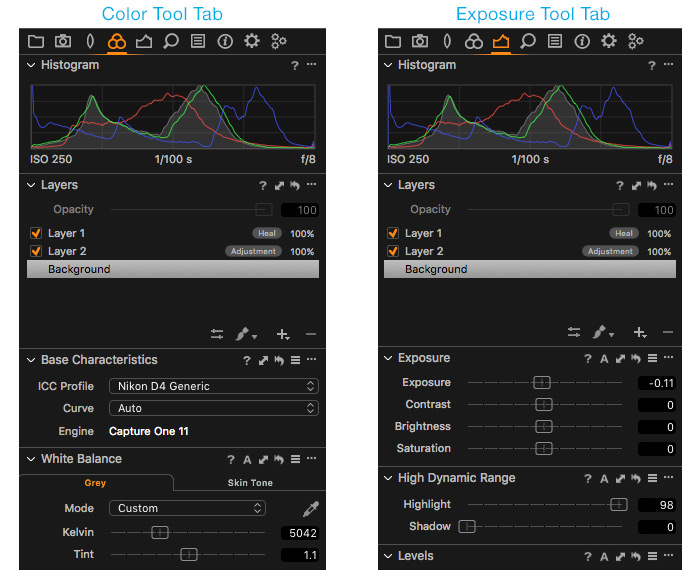
Second significant change – there is no Adjust Selected Layer feature anymore. When you’re on the layer, all the supported tools display the brush icon to indicate that you’re making local adjustments now. I think that’s a right decision – it simplifies your workspace and makes it more intuitive.
Ok, interface – cheсk, now we’re going where the magic begins:
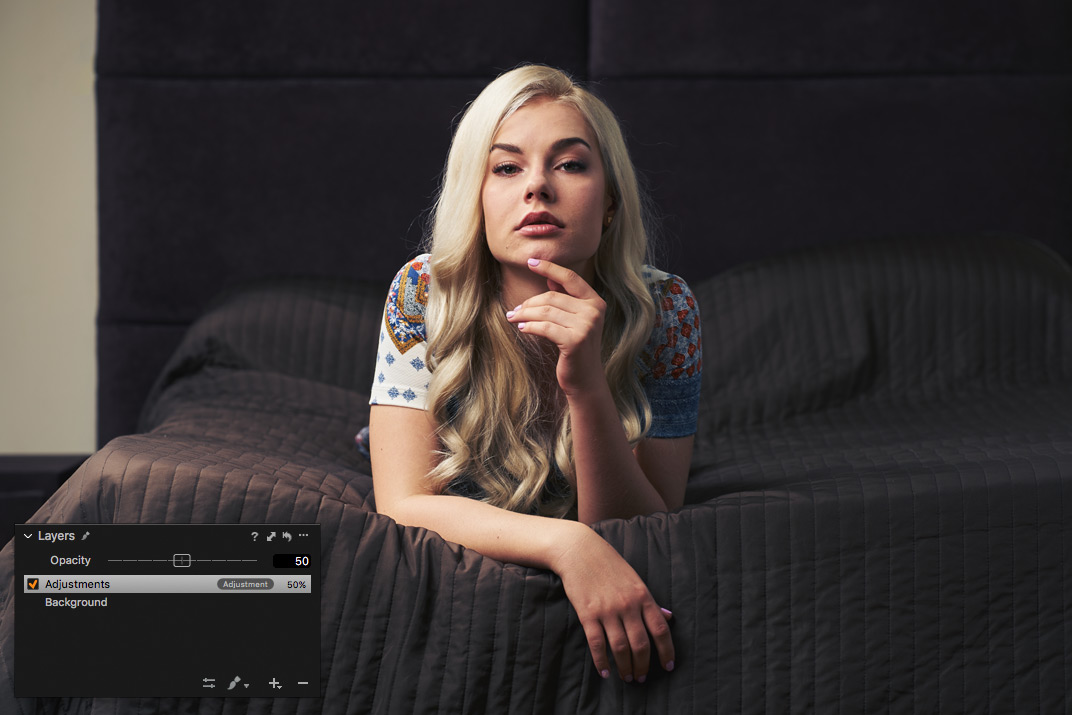
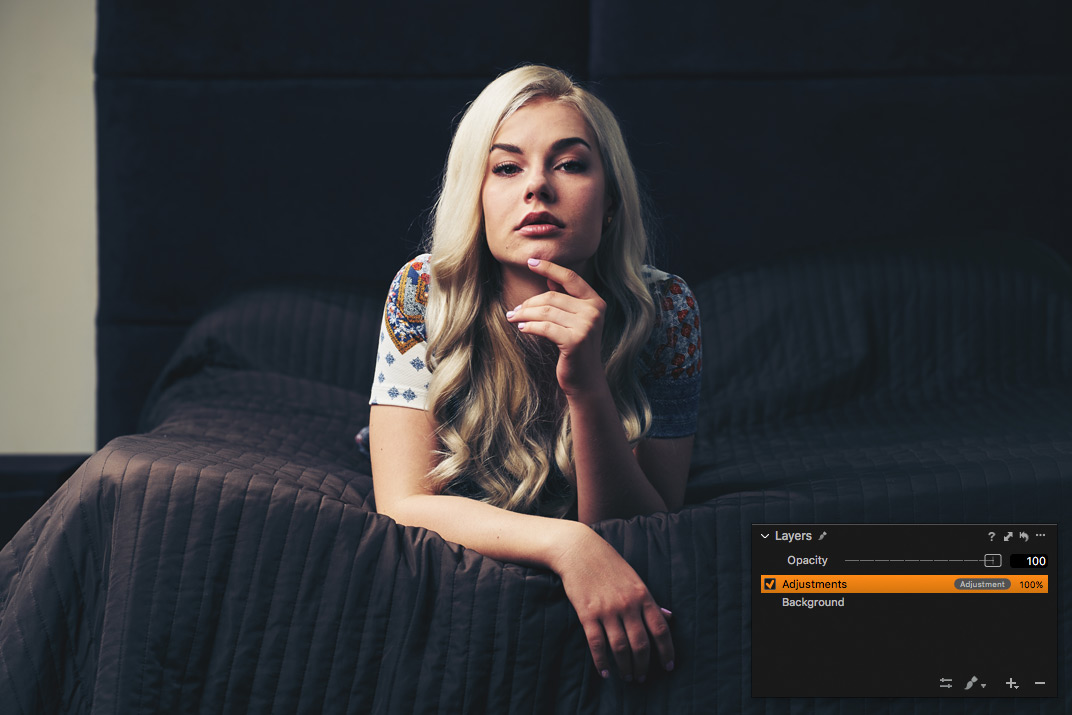
Layers Opacity
This is what Capture One users (including myself) had been asking for years. The truth is that “opacity for layers” sounds like a nice idea, but only until you’ve tried it.
In practice, you realize that it’s an amazingly-fantastic-in-its-awesomeness feature.
Actually, after few weeks of beta-testing of Capture One 11, I don’t see the reason to work with the background image when you can have all the editing in layers.
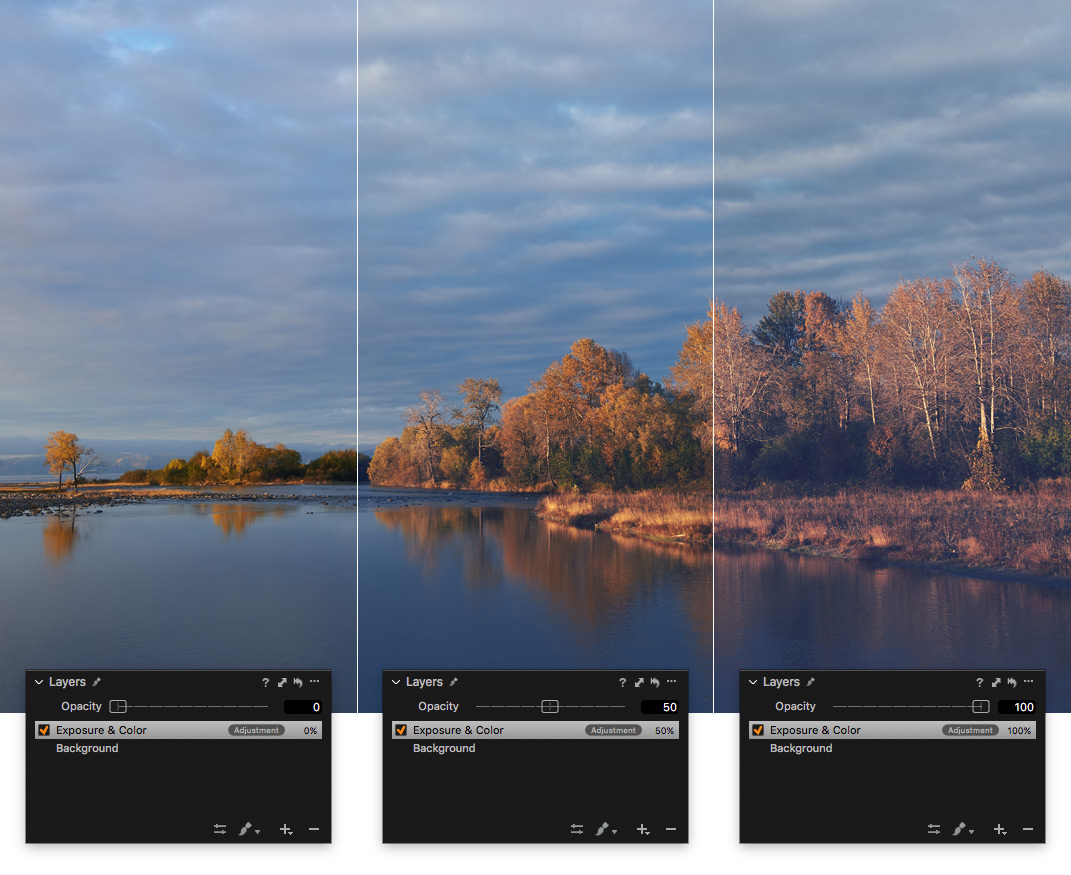
Just imagine that at any moment you can change the opacity of all your image adjustments. What is even more important – you can change opacity differently for each of 16 available layers. On the RAW file. Just think about it for a second.
Applied style – Kodak Royal Gold 400 v4 Winter from Film Styles Extended Set.
Impressive, right? Then, how about this: you can also apply style or preset to any layer and change its opacity as well.
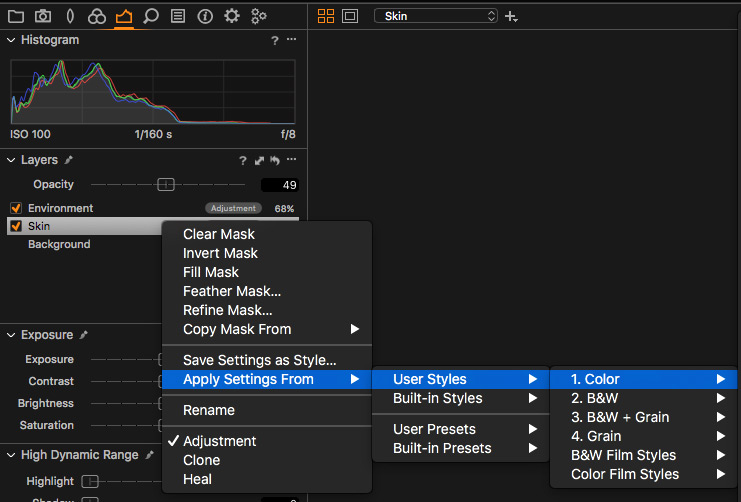
Styles and Presets for Layers
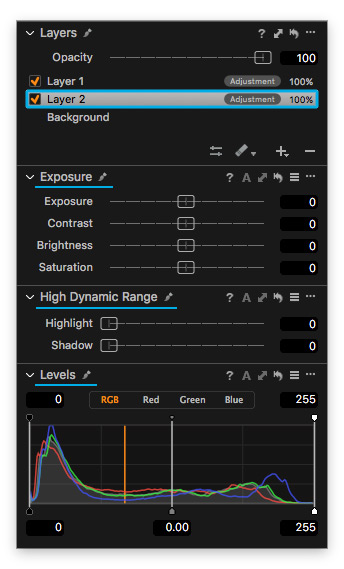
In Capture One Pro 11 styles and presets can be assigned to layers. Sounds great, but let’s make a short revision of what we’ve already got:
- All the primary tools work with layers
- Mask opacity (brush/eraser)
- Master opacity for each layer
- Masks from Color Editor
- Copy, Invert and Fill mask features
- Styles and Presets work with layers
Now, let’s see how it all works together.
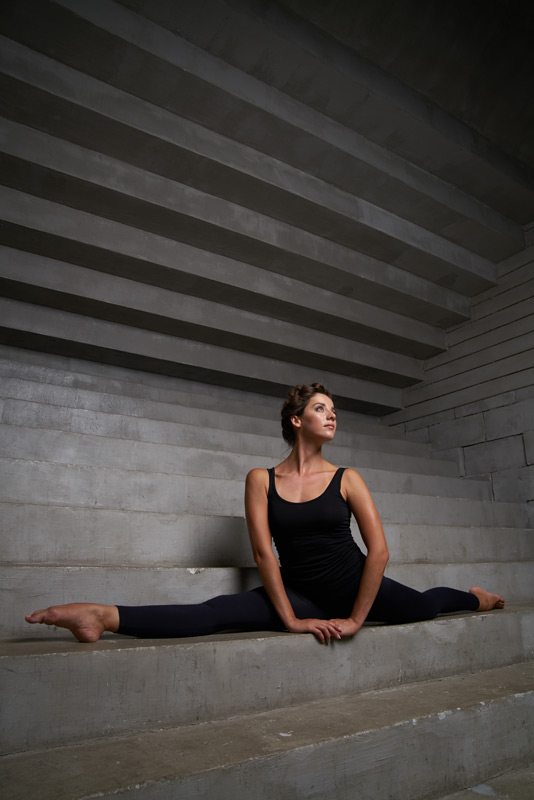
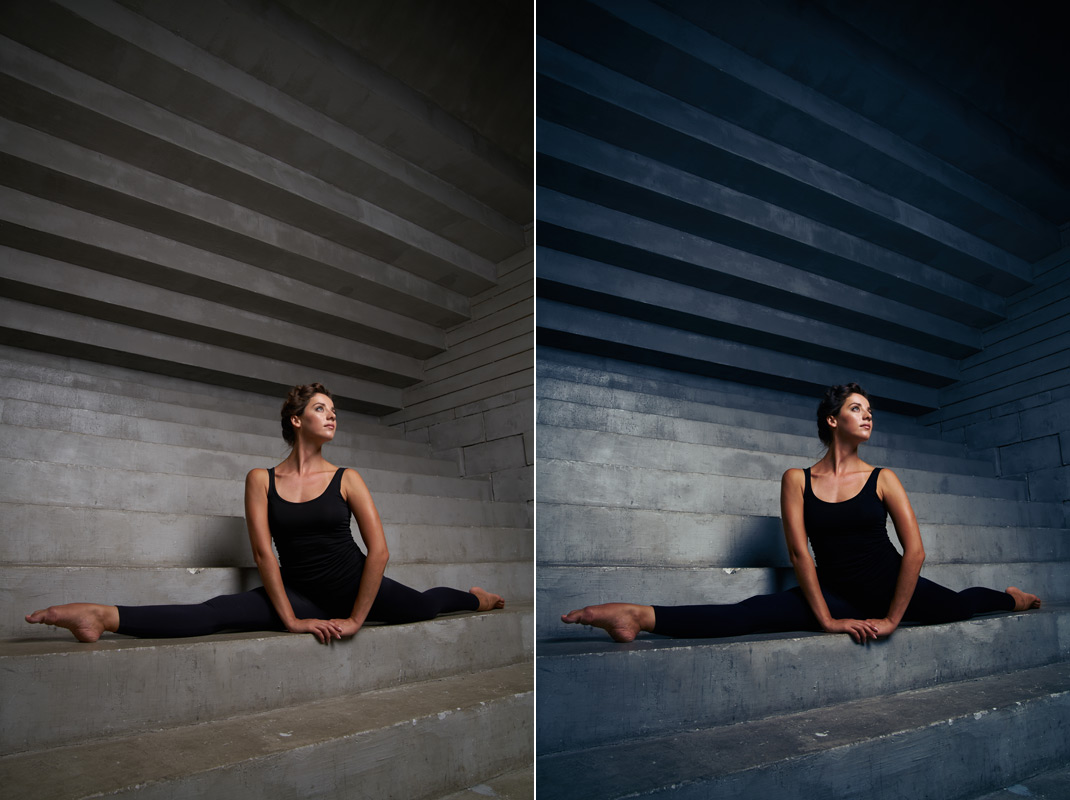
In just a few clicks I’ll make quite complicated adjustments to this image:
Step 1
Creating a mask from skin color to have a layer with skin mask only.
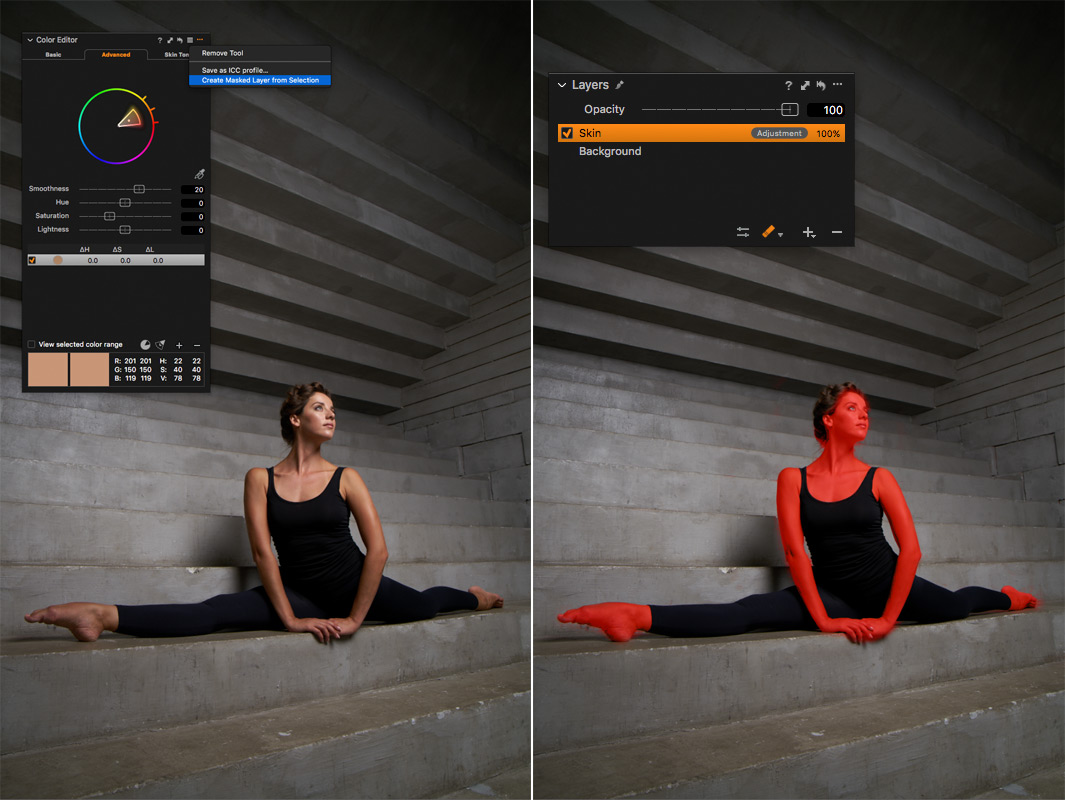
Step 2
Copying skin mask to a new layer and inverting it to have a layer with a masked environment.

Step 3
Applying different film styles to each layer and adjusting opacities to achieve the best look.

Magic.
It works fantastic for landscapes or any other images as well:
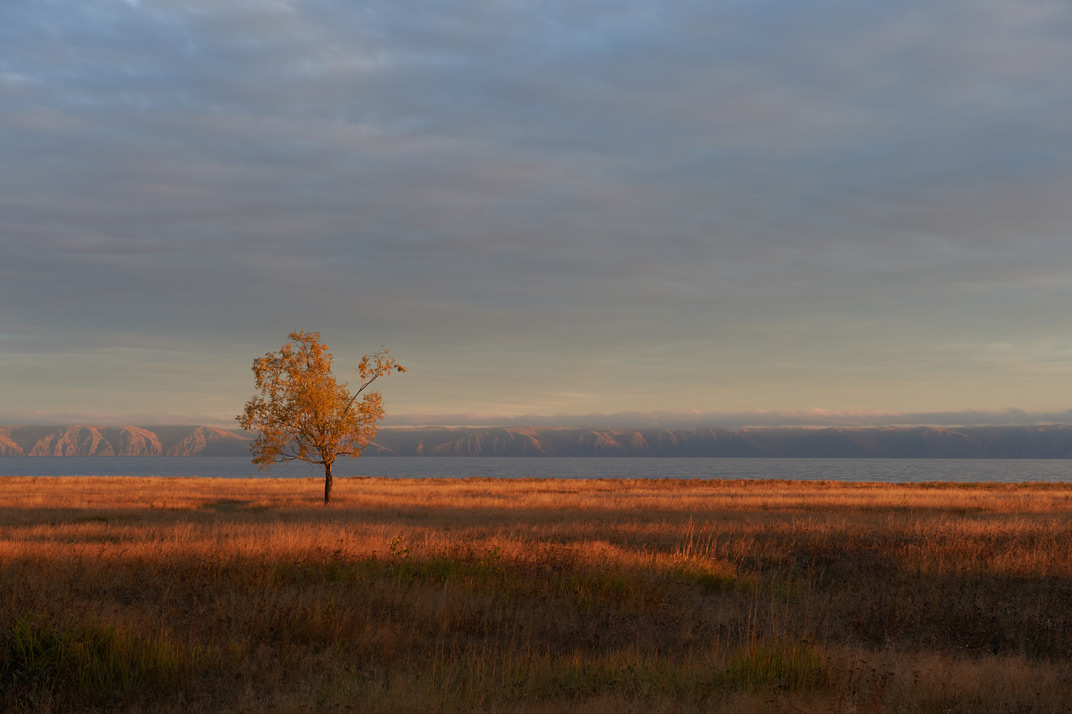
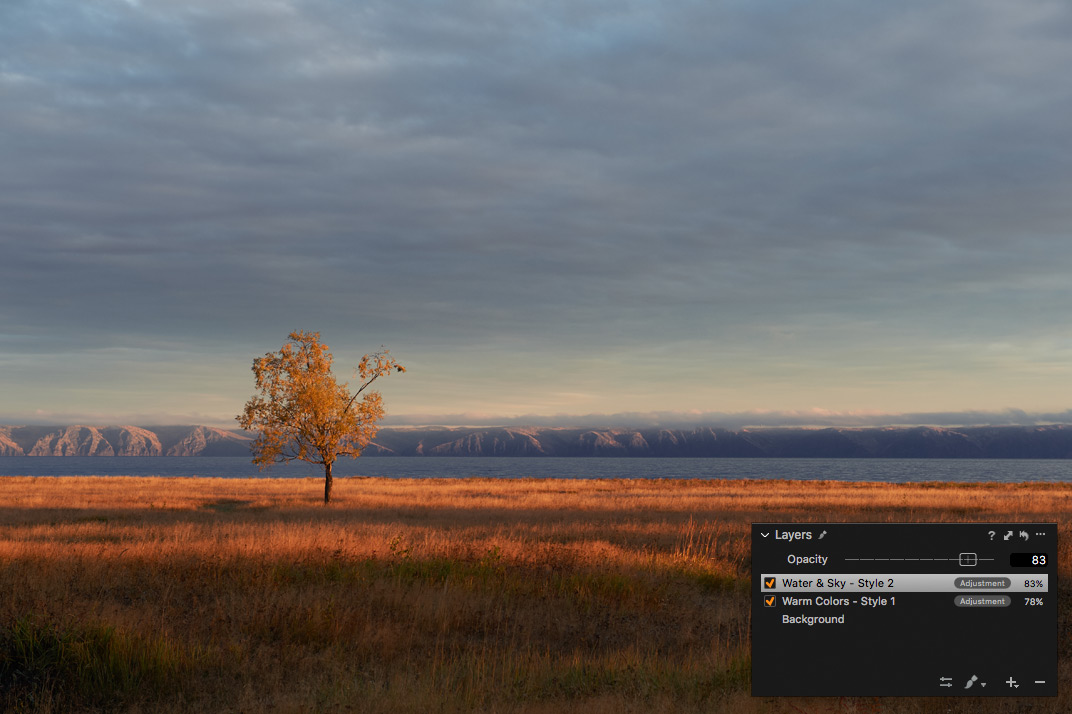
Applied styles: on Warm Colors layer – Fuji Provia 100F v4 Summer; on Water & Sky layer – Kodak Ektar 100 v4 Winter from Film Styles Extended Set.
In previous examples, I’ve used 1styles.pro Film Styles for Capture One, they are updated for Capture One 11 and are compatible with layers.
Here is a link to download 12 sample styles for free.
Simply try them on your images with layers, it’s entirely new experience for RAW editing.

Useful Improvements to Layers
Layer-oriented processing requires more tools to work with masks. Capture One Pro 11 allows you to create a new filled layer or clear mask with just one click:
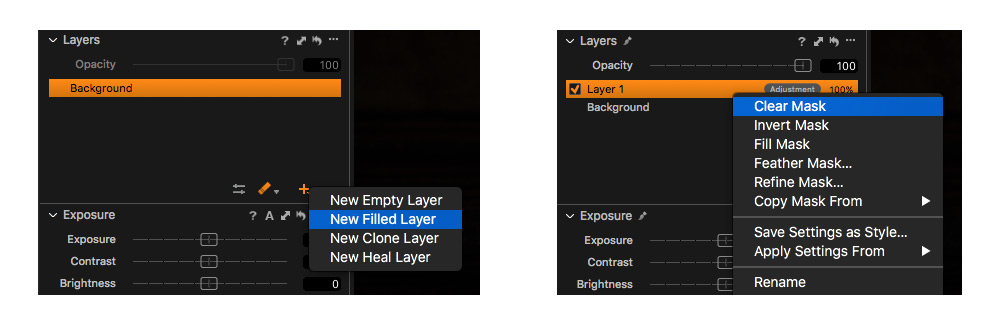
Developers have also added Feather and Refine mask edge options. Feather tool makes mask edge softer:
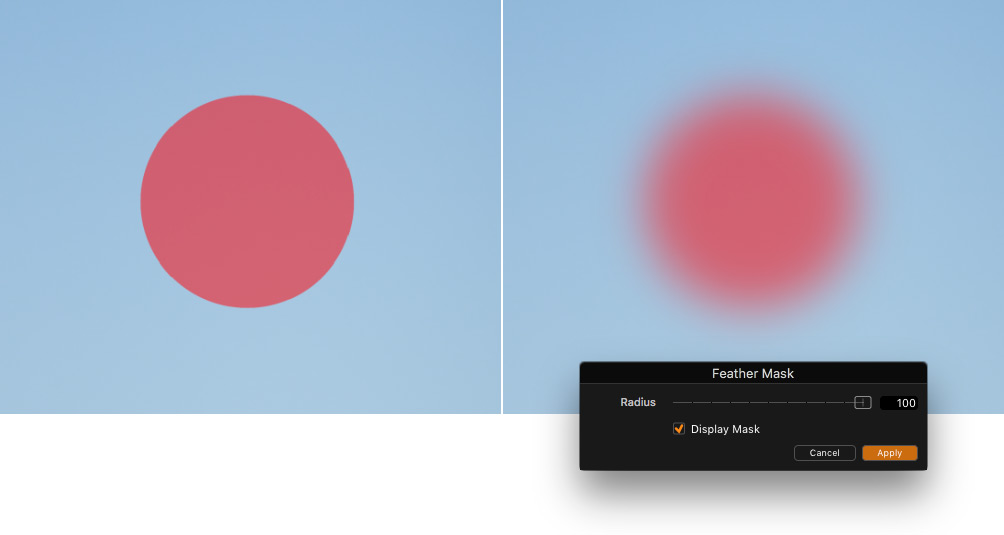
This is a quite useful feature when you have drawn a complicated mask which needs to be corrected a little bit.
The new Refine tool is absolutely brilliant – it enhances the mask and makes it much more accurate.
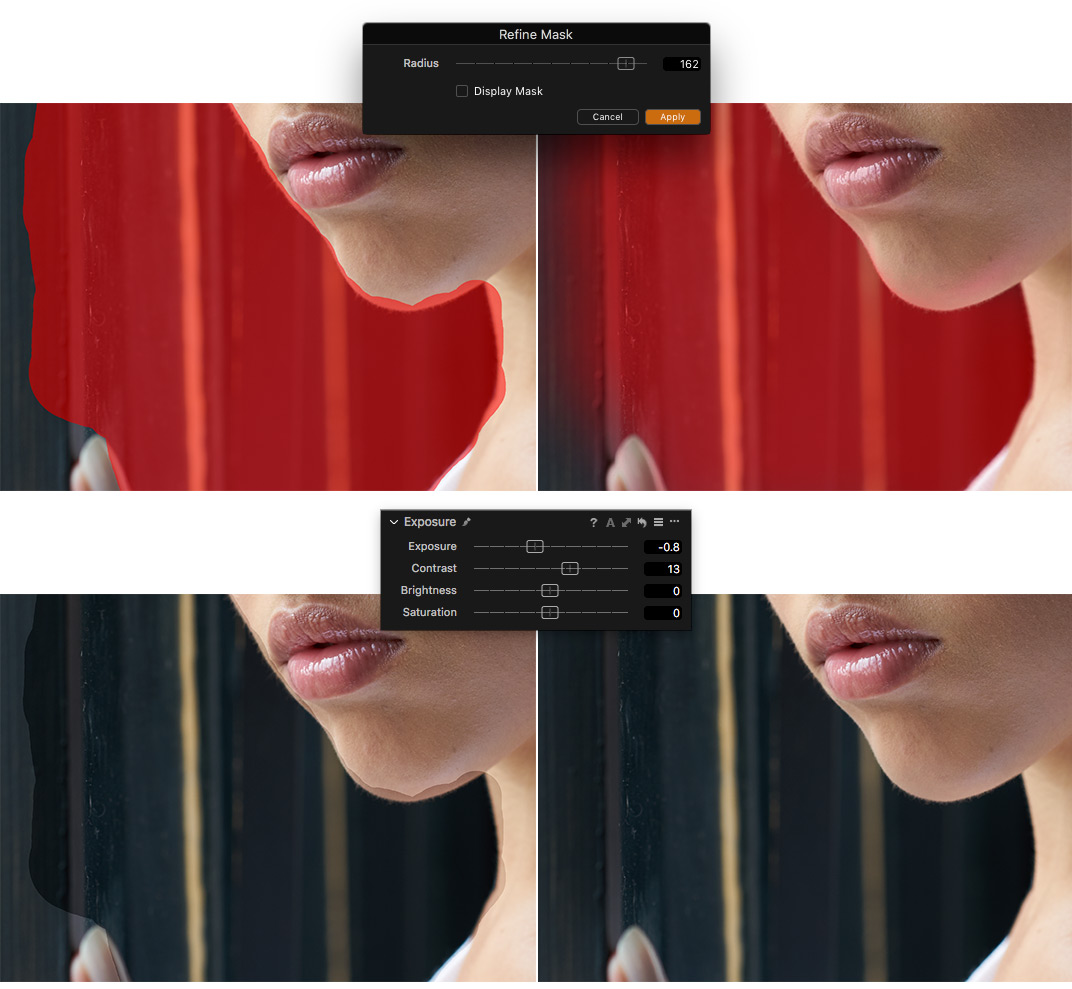
Developers suggest to use Refine tool in combination with Auto Mask, but I found it works perfectly with masks from Color Editor and regular masks as well.
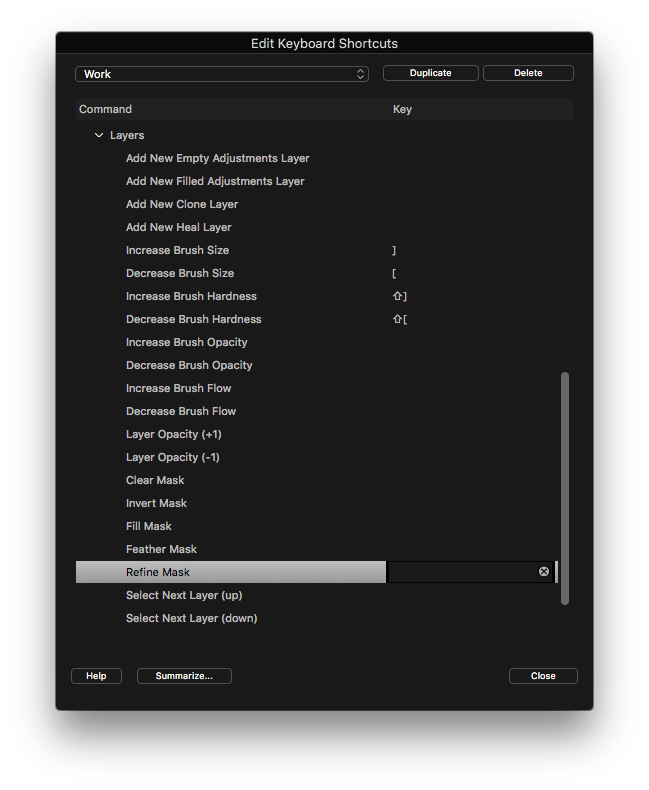
Don’t forget: you can assign all the layer actions to hotkeys and significantly increase the speed of processing.
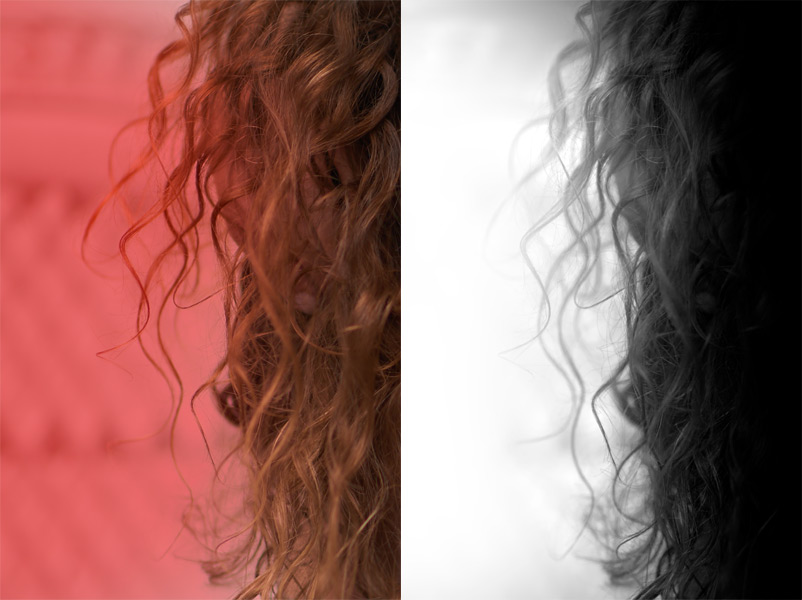
Grayscale Mask Preview
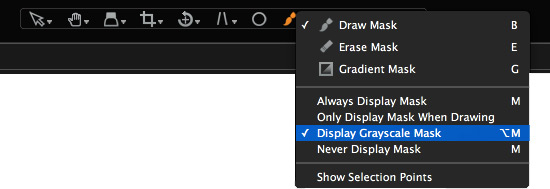
The last update regarding the layers in Capture One 11 is Grayscale Mask preview.
Now you can switch to greyscale view of the mask without image underneath: black is unmasked, white is masked and areas with different opacities are shown as shades of grey. The high-contrast mask makes it easier to see the masked areas, especially when you have applied Refine mask to the layer.
![]()
Engine Upgrade

If you’re new to Capture One here is an important thing to remember – you have to upgrade your file engines to make them compatible with Capture One Pro 11’s new features.
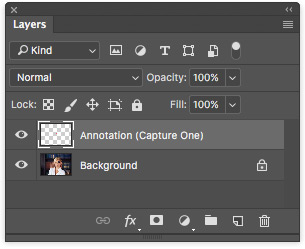
Annotations
In case you regularly work with retouchers, I’m pretty sure you wished for communication tools in Capture One. Now you can draw annotations right from Capture One with this new tool:

Annotations are stored as standard Capture One image settings, that’s why you can easily pack it as part of EIP file. But what is more interesting – annotations can be processed as a layer in PSD file with the image.
Export with Assets
Yes, Capture One Pro 11 can process some workflow information with JPG/TIFF files and PSD layers!
Phase One called this feature “Export with Assets,” and it allows to export images with additional information:
- Annotations. Great new tool to improve communications between photographers and retouchers.
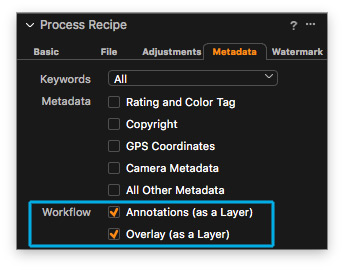
- Crop as a path. In the processed PSD, crop is stored as a path.
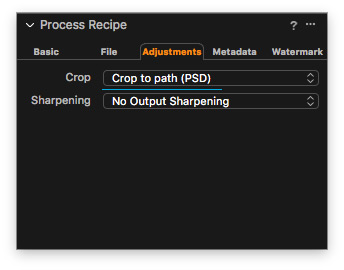
- Overlay as a layer. Now Overlay image can be preserved in the processed file, for PSD files – as a layer.
- Watermark as a layer. Works the same as Overlay.
I think it’s a truly vital improvement for professionals and I’m pretty sure that we should see some additional asset types in the 11.1 or 11.2 releases. Let me dream a little bit: Capture One layers as PSD layers! Uh…dreams-dreams…
LAB readouts
Unlike RGB and CMYK, the LAB color model is based on how we perceive color. That’s why there are a lot of benefits for using it, and it is widespread in photography and many other industries.
I saw questions about LAB in Capture One here and there since Phase One released Luma Curve (which works in the similar way as Lightness channel in LAB).
In Capture One Pro 11 there is no full LAB support yet, but we can use LAB readouts now.
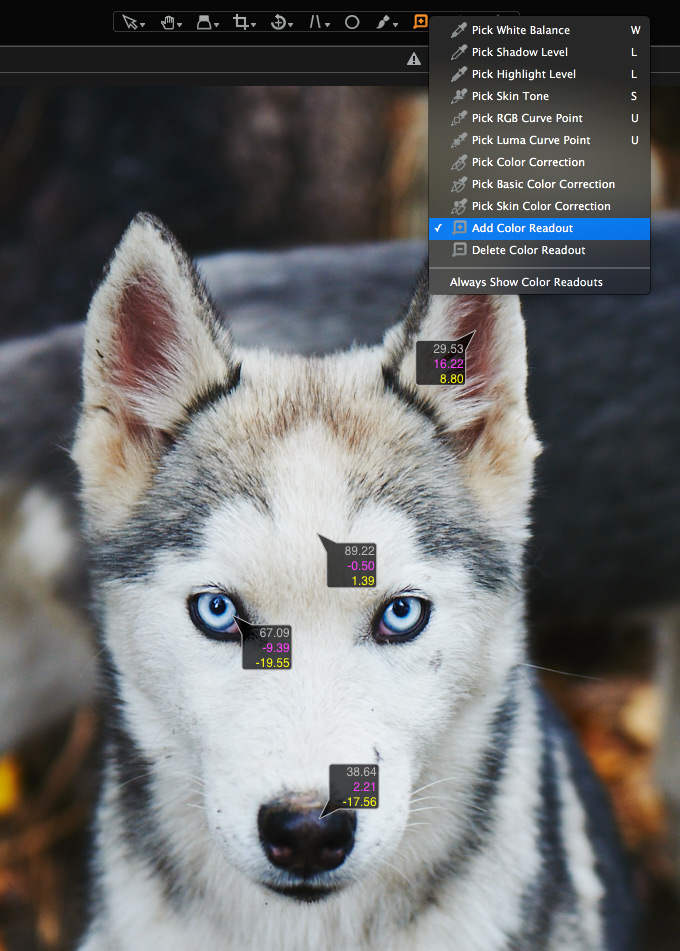
To turn it on, just navigate to the View menu –> Lab Readout. By the way, LAB numbers are also shown below the toolbar, which is an even more useful feature for me.

Duplicate Checker for the Importer
Yes, it’s finally here – Duplicate checker.
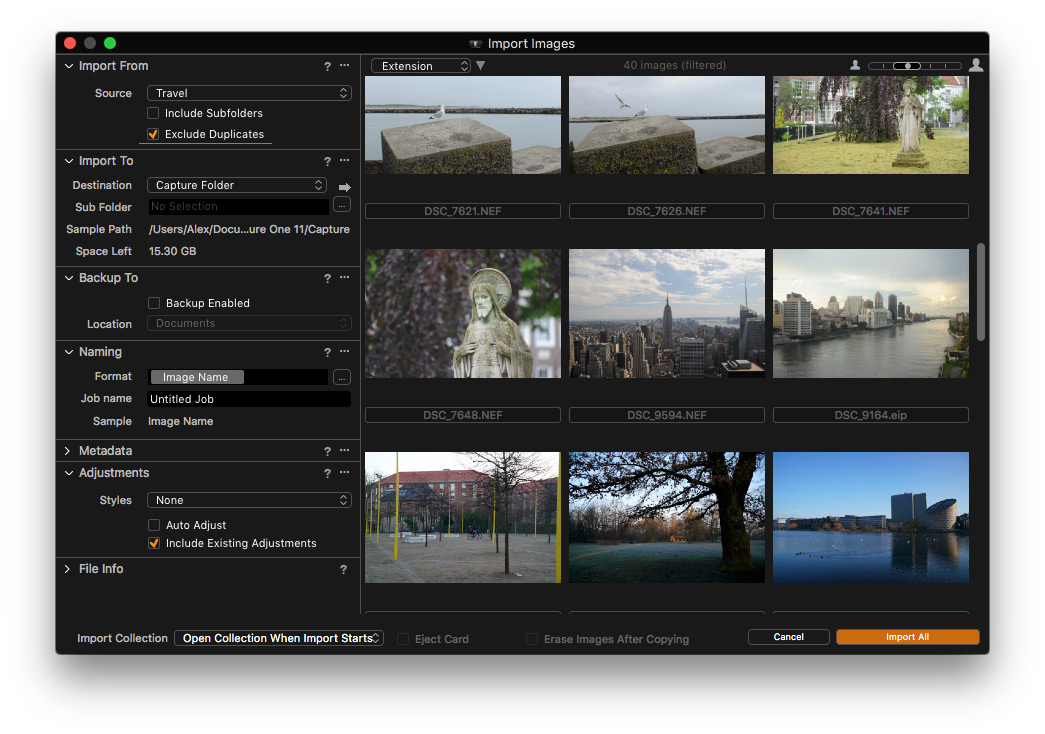
Now you’ll have no issue with duplicates of images during the import.
Multi-view Redesign
When talking about the interface, in Capture One 11 you’ll not find the classic Multi/Primary view buttons.
![]()
Now it’s a single switch, which actually makes perfect sense.
Improved Back-up and Restore for Catalogs
If you’re working with catalogs, I highly recommend that you always create backups.
Previously, backup and especially restore mechanisms were not really intuitive in Capture One.
In Capture One Pro 11, developers have updated them and now app will automatically help you with repair in case of crash or corruption of the catalog.
You can also manually restore the catalog at any moment.
Expanded AppleScript
Capture One Pro 11 also brings lots of new parameters for AppleScript:
• Adjustments (Limited to those also available in SDK)
• Layers and Layer functions
• Adding and moving variants between collections
• Exposure Evaluation Tool
• Clones and variants (pick/promote/demote)
• Styles/Presets
• Export
• LCC apply/remove
• Filters
I’m still waiting for a great paid Capture One scripts to see on the market. Or maybe I shall develop them myself? No, no… Who am I kidding… I’m just a photographer, not a programmer. But if you’re – write me a letter at [email protected]
Golden mountains are waiting for us ahead. Or just lovely freeware scripts to make people around us a little bit happier.
Pricing
Capture One Pro 11 license (single user – 3 seats) price is 279 EUR / 299 USD
If you wish to upgrade your Capture One Pro 9/10 license to Capture One 11 it would cost 119 EUR
There is also a subscription option available:
Single user – 3 months subscription – 30 EUR per month
Single user – 12 months subscription – 20 EUR per month
Single user – 12 months subscription (pre-paid) – 180 EUR
Capture One 11 for Sony
For Sony camera owners there are two special versions of Capture One 11:
Capture One 11 Pro For Sony – 79 EUR
This is the same Capture One Pro 11, but it works only with Sony RAW files.
Capture One 11 Express For Sony – free!
Express version doesn’t have some nice features like tethered capabilities, masking, local Curves and few others features.
Capture One 11 Express works only with Sony RAW files too. In everything else it’s the same Capture One 11 and it’s absolutely free.
If you wish to upgrade your Capture One Pro for Sony 9/10 license to Capture One Pro for Sony 11 it would cost 69 EUR.
Learn more about Capture One for Sony.
Learn more about Capture One
If you’re new to Capture One, here are five things which I recommend you to do:
1) Download the Free Guide to Capture One
“Mastering Capture One” is a free guide to learn Capture One and a collection of more than 110 links to the best articles and videos to study each topic.
The first part – “Essential Training” will give you everything you need to begin working in Capture One without a mass of overwhelming information.
You can read it online or download it as PDF right here:
Download
2) Subscribe to my Newsletter
Each issue of the newsletter contains:
- Latest news from Capture One community
- Reading of the week
- Capture One tip of the week
- A free RAW file for practice
It’s absolutely free, and I promise not to send emails more often than once a week!
3) Download 12 film styles for Capture One for free
In my work, I use 1Styles.pro Film Styles. There are more than 200 styles which you can quickly scroll through and immediately see which would fit your image best.
You can download five film styles for free right here:
You’ll find seven additional free styles at this link.
Simply try them with your images – it’s a completely new experience for RAW editing.
4) Subscribe to my YouTube channel
Each week I’m running Capture One Live Show where we’re discussing the latest Capture One news, and I’m showing my favorite tips for RAW editing.
And the best thing is that you can watch it live and ask questions!

Plus: you can upload your RAW files to see how I would edit them in one of the next episodes of the show.
5) Join our Facebook group or follow me on Twitter
Here I’m sharing the most interesting articles and videos about Capture One which I found recently.
In the end
What is happening right now is a hidden revolution in photography.
Smartphones make better and better images due to new complicated built-in process algorithms. Give it 3-5 years, and you will see the quality of photographs which only professional photographers would be able to compete with. Shortly, there will be no place for semi-pro image processing software – computer algorithms will deal with any basic editing much better.
That’s why, if you wish to be valued on the market as a professional – master your processing skills.
If you’re already using Capture One – keep implementing new features into your workflow to be relevant for modern requirements and to surpass them.
If you’re still working with Lightroom or any other basic-level RAW converter, there is only bad news for you. In 2-3 years you will notice that your processing is far worse than your colleagues and iPhone XII makes almost the same images automatically right from the box. In 5 years, there would be no place for you on the market. But right now you still have a chance to jump on this last train to the new RAW processing reality with Capture One 11.
Learn more about Capture One
If you’re new to Capture One and thinking about migration from Lightroom or any other software, I would like to recommend you to read
my article “10 reasons to switch to Capture One”.
It shows the features which I didn’t include in this article, but they made Capture One such a fantastic tool for photographers as it is now.

Author – Alexander Svet
Alexander Svet – professional photographer and specialist in image processing.
Phase One Certified Professional and Capture One trainer.
AlexonRAW.com