

This post contains affiliate links and/or codes, so if you purchase a product through such a link or with such a code, I may receive a small commission at no extra cost to you.
This week I’m publishing the third free chapter from “Photographer’s Guide to Capture One 12” book: “Aligning color and brightness across multiple images with Normalize tool”.
Read previous free chapters from the book:
“Photographer’s Guide to Capture One 12” is a comprehensive guide to Capture One, which works just perfectly if you wish to become familiar with all the Capture One tools or to fill in some gaps in your understanding of how Capture One works.
In the full book, you will find 60 chapters (over 460 pages) of similar quality with more than 750 screenshots.
Plus, you can get a 10% discount for “Photographer’s Guide to Capture One 12”! Just enter this code ALEXONRAW at the checkout and you’ll immediately get the discount.
Aligning Color and Brightness Across Multiple Images with Normalize Tool
The Normalize tool is perfect when you want to align images where the color and brightness of a specific subject need to stay constant. It works great for keeping a product color persistent in the studio or editing event photography where the lighting conditions change all the time, and you need a certain part of the subject – like a wedding dress – to maintain the same white balance and exposure throughout several images. The Normalize tool can also be used to enter a specific target color value from a color checker chart and then conform the white balance and exposure to a patch on the color target.
The tool works by adjusting the Exposure slider in the Exposure tool as well as the Kelvin and Tint sliders in the White Balance tool. Keep this in mind.
The Normalize tool replaces the Skin Tone feature from the White Balance tool in previous versions (Capture One 11.0 and earlier). The tool is by default positioned below the White Balance tool in the Color Tool Tab.
Selecting a color target
Select the Pick Normalize Color cursor from either the Normalize tool or the cursor toolbar. You can also use the keyboard shortcut N. Then click on the subject in the image that contains the desired color and brightness.
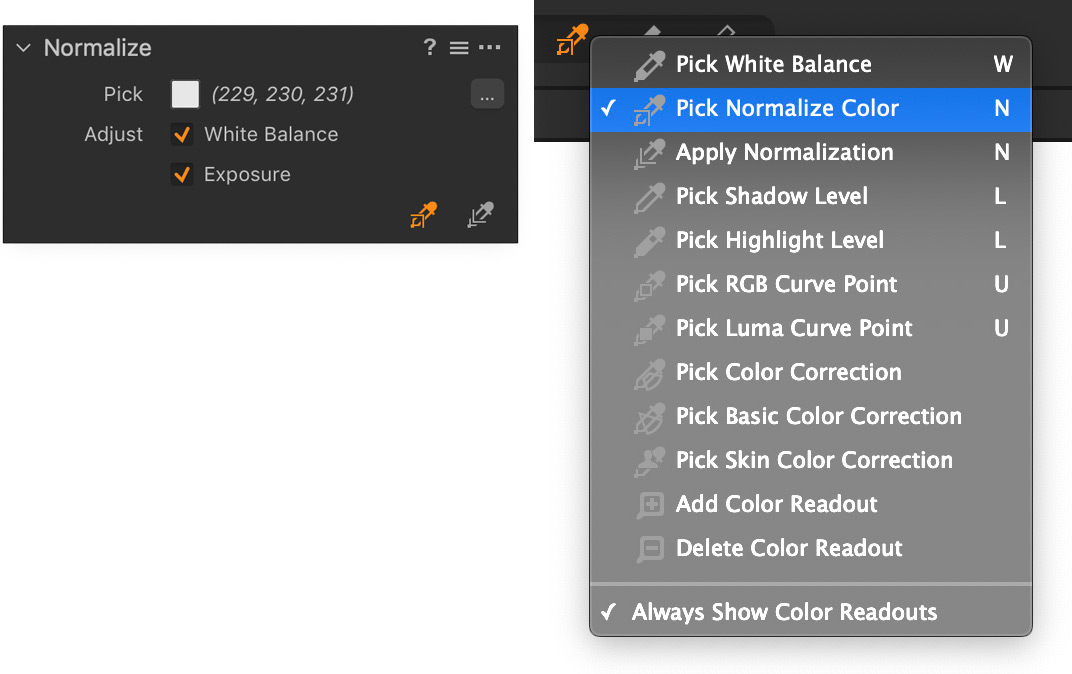
The target color as well as the red, green, and blue color values will now be shown next to Pick. You can click on the color patch if you want to check or tweak the values. This opens the Color Selector dialog box which we will cover later in this chapter.
Applying a normalization target
The tool will adjust both the White Balance and Exposure from those tools by default. You can deselect either option if you only want to normalize one of them. Then select the Apply Normalization cursor from either the Normalize tool or the cursor toolbar. If the Pick Normalize Color cursor is already selected, you can use the keyboard shortcut Shift + N.

Then click on the subject in the image that should match the desired color and brightness, and the image will be automatically adjusted. You might need to try a few different spots on the subject before the result is perfect. It is worth to point out that the tool can change the overall white balance quite dramatically if the difference between the picked color and the target color is large.
Tip: Once you have selected either of the Normalize cursors, you can switch quickly between picking and applying a normalization target by hitting Shift + N or switch temporarily by holding down Alt.
Resetting a normalize adjustment
You should be aware that the Normalize tool does not have a reset feature, so if you want to undo the adjustment later on, you will have to reset the Exposure slider in the Exposure tool as well as the Kelvin and Tint sliders in the White Balance tool.

Entering a target value manually
You can manually enter a target color in the Color Selector. This can be handy if you need to match color and exposure of a color patch on a color
checker chart, for example. You open the Color Selector dialog box by clicking on the color patch next to Pick.
You can now enter the required R, G, and B values for the patch target. Notice how you can also enter a color with HSB-values based on the hue (H), saturation (S) and brightness (B).
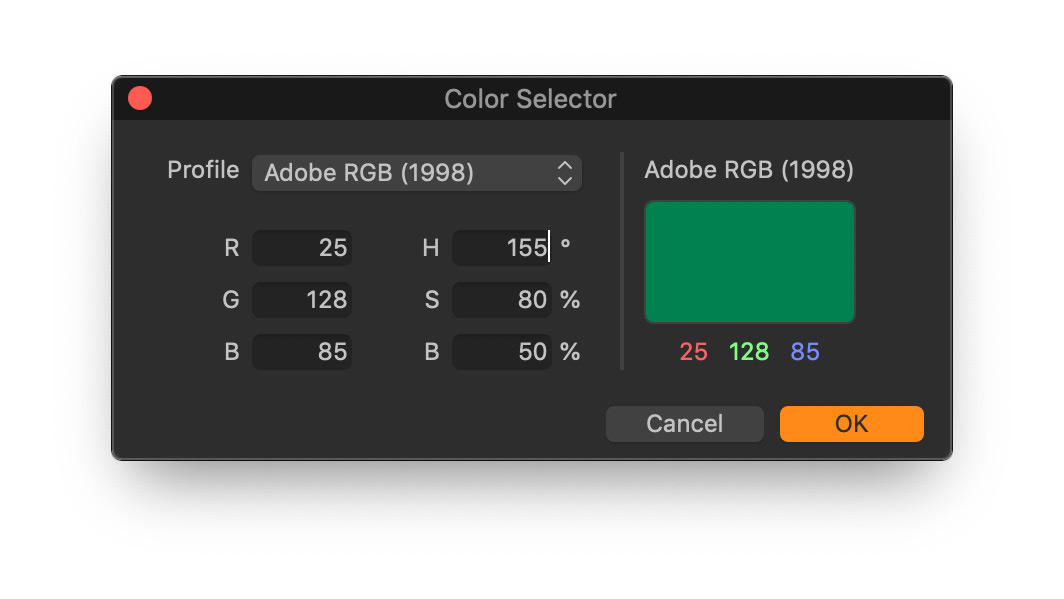
Click OK when done. Then choose the Apply Normalization cursor, click on the target patch, and let Capture One do the work.
No copy adjustments
The Normalize tool does not have a feature to copy the adjustments from one image to multiple other images since the tool needs a target area that is specific to each image. You can copy the Exposure and White Balance from those two tools as a workaround, but this solution only makes sense if the target images need exactly the same adjustments to Exposure and White Balance.
Get the full version of the Photographer’s Guide to Capture One 12 and learn about these additional features that are covered in the Noise Reduction chapter:
- Saving and reusing a Preset/li>
- Using Normalize with Layers
The eBook is available in both the ePub, PDF and Mobi (for Kindle) file formats which are included in the single purchase.
Get 10% OFF Photographer’s Guide to Capture One 12
How to Get the Discount?
1. Go to the store to buy the book.
2. At the checkout, enter this code ALEXONRAW and you’ll immediately get 10% off.