


I’ve prepared for you a three-part guide that covers all the aspects of event photography processing in Capture One:
- Part I. Building Fast and Efficient Event Photography Workflow
- Part II. Batch Editing in Capture One Best Practices
- Part III. Capture One Export Settings
Now, for the first topic:
Part I. Building Fast and Efficient Event Photography Workflow
Apart from running my Capture One blog, I’ve been an event photographer for 12 years doing all the editing in Capture One only. So, don’t believe that Capture One doesn’t suit batch editing needs; you can easily and quickly edit hundreds and even thousands of images there.
To build an effective workflow for this task, start with these three steps:
- Set up an event photography workspace
- Speed up culling and editing with custom shortcuts
- Automate as many adjustments as you can
Let’s start with a workspace.
In event photography, you need to place all the key tools in a single tool tab and remove/relocate all the other tools. Focus on the accessibility of the most used tools; every second spent on reaching a tool transforms into hours of wasted time.
So, what tools are we going to pick?
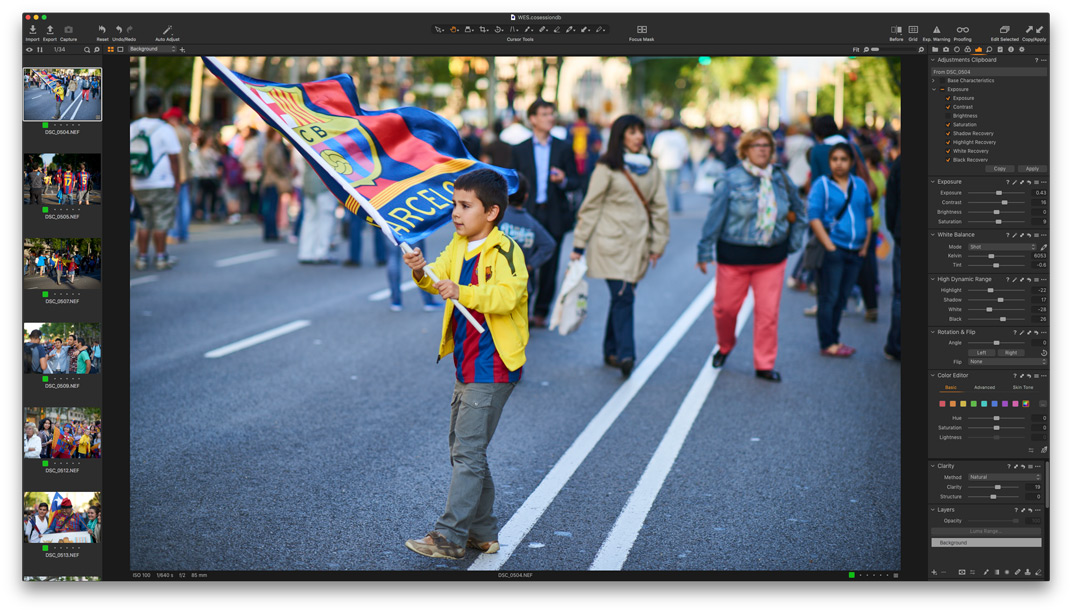
Pinned area:
- Adjustments Clipboard (useful for group editing, more on this in Part II)
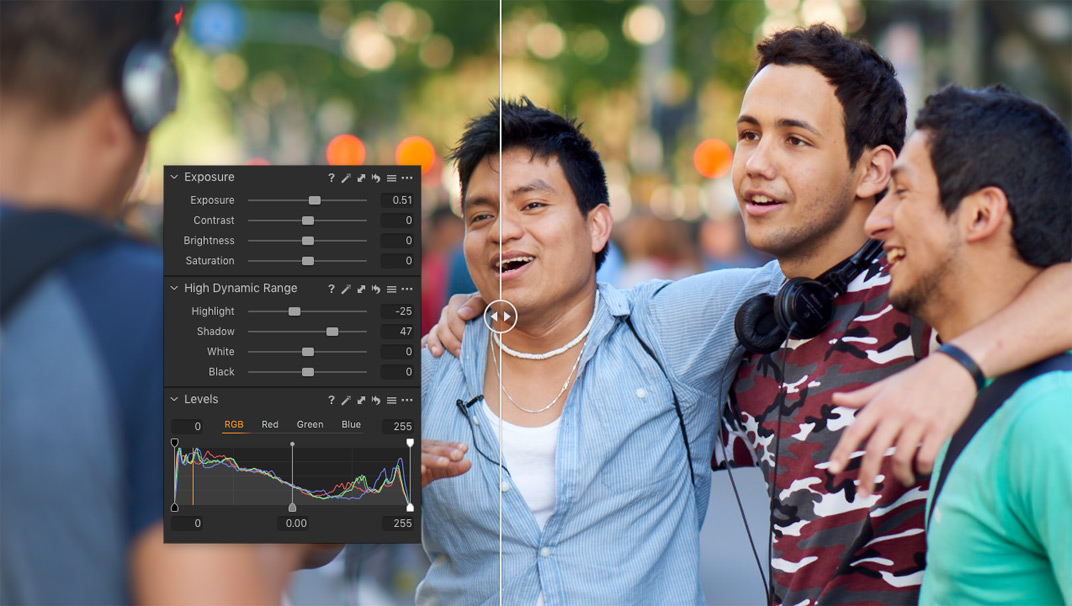
- Exposure
- White Balance
- HDR (these are the three tools you’re going to use the most)
- Rotation and Flip
- Color Editor (Basic mode is now pretty compact)
Scrollable area:
- Clarity
- Layers (we’re not going to manage layers so often)
- Levels
- Color Balance (for some non-formal editing with color toning)
I also recommend you to place all the advanced tools (Styles and Presets, Advanced Color Editor, Curves) in a separate tab and set shortcuts for these two tool tabs. Thus, you’ll quickly switch between two tabs with all the tools you need for event images.
What shortcuts are crucial for image culling and batch editing?
- Ratings and Color Tags
- are the main culling tools, so make sure that these shortcuts fit your preferences. If you’ve migrated from LR, note that you can easily set color tags to numbers.

- Loupe (shortcut P) allows you to see a selected part of your image with 100% zoom quickly. It’s extremely helpful for fast culling.

- As you will learn from Part II, batch editing is based on copying and applying adjustments. You need to make as little individual adjustments as possible. Capture One offers several ways for copying/applying, but these shortcuts fit batch editing the most:
For quick copying, use the Copy and Apply Adjustments shortcut. Select the source image and all the images to apply adjustments, click the shortcut, and it’s done.
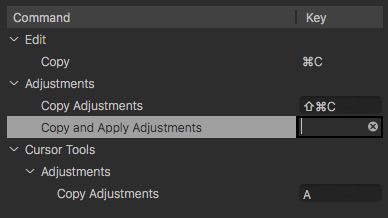
For advanced copying with the clipboard, use Copy Adjustments/Apply Adjustments shortcuts.

Of course, you need to learn and to use shortcuts for all the main tools: Crop, Brush, Direct Color Editor, etc.
If you’re new to Capture One, there is a simple way to memorize all the shortcuts. In the Shortcut Editor window, click Summarize, and you’ll get a list of all available shortcuts that you can print and always have nearby.

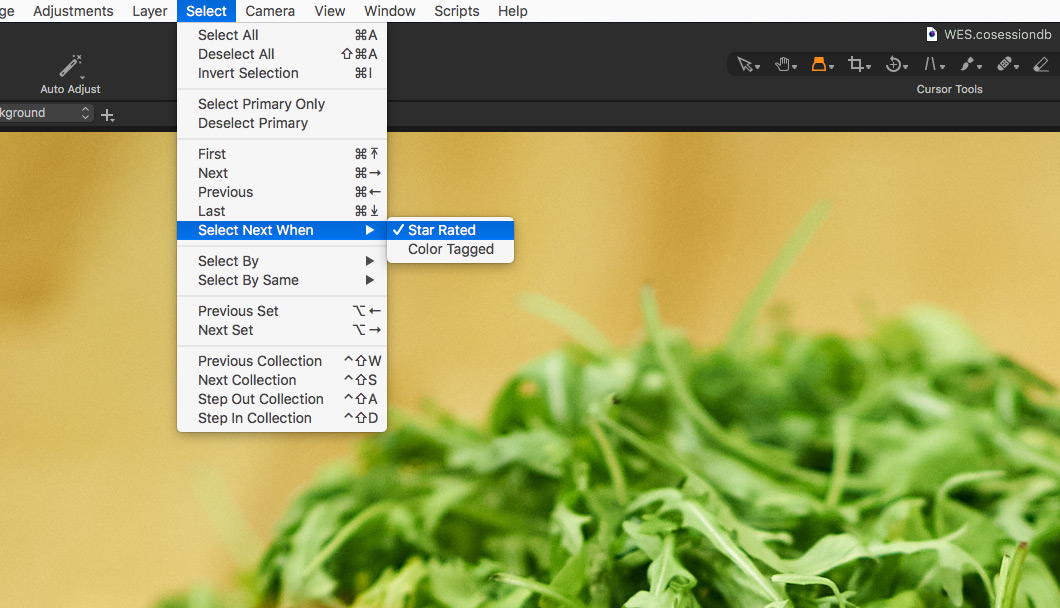
Apart from shortcuts, there is another perfect feature for your culling workflow – Select Next When.
It allows you to switch to the next image automatically once you set a rating or a color tag onto your image.
To enable auto-switching go to Select > Select Next When:
So, you have customized your workspace and shortcuts; the next step is to automate all the basic editing.
Automate as many adjustments as you can
One of the main hints to speed up your batch editing is to automate most of the basic edits. Let’s see how it works.
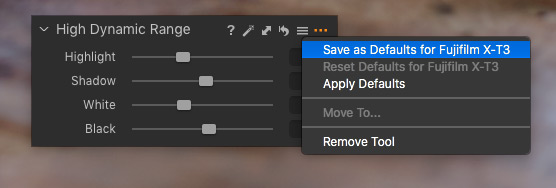
First of all, some adjustments can be saved as defaults for your camera. Thus, you wouldn’t need to apply them manually; they will appear automatically as soon as you open the RAW file. If you shoot lots of events or have a separate reportage camera, that would make sense for sure. Otherwise, you can save these settings as a style.
To set defaults, you need to make adjustments in a tool and click the “…” button. In the drop-down menu, you’ll see Save As Default for /your camera/ option:
Here are some default settings that work well for event photography. Note that these adjustments highly depend on your shooting/editing style, so it’s ok if you feel like you need to modify them.
Exposure
- Exposure: +0.5 (if you prefer to shoot slightly underexposed images, as I do)
- Contrast: +7
- Saturation: +5
HDR
- Highlight: -30
- Shadow: +5
- White: -30
- Black: +10
Sharpening
- *set adjustments that fit your gear*
Plus, if you’re a Fuji photographer, don’t forget to set Film Standard as your Default curve. Otherwise, the Auto curve will inherit Film Simulation from your camera settings. That’s not bad, but I prefer to have all the control over adjustments for batch editing.

As default adjustments are all set, it’s time to perform auto adjustments.
Due to the nature of auto adjustments, you can’t really rely on them. For exposure-balanced images, you can auto-adjust Exposure, Brightness, Contrast, and HDR. Still, auto-corrections wouldn’t work well for most indoor events.
The only tool that works great in auto mode is Levels. If you know that your files might require some level adjustments, feel free to apply them in auto mode to all images. Levels auto mode is strictly regulated by Capture One settings:

Thus they never clip more information than you allow.
Finally, after default and auto adjustments, you can apply some common corrections that fit your shooting. The point is that most events are happening in more or less similar conditions. Thus you can easily set general White Balance and correct defaults if they hadn’t worked well.
Plus, try to set basic color edits at this stage. It’s always a good idea to enhance blue sky or greens in your images if you have lots of similar RAWs. You can also fix a color cast that might appear on your images in specific shooting conditions.
Keep in mind that your goal is not to find some universal adjustments that perfectly fit all images. That’s impossible. But you can easily set adjustments that match well most of your images, and you’ll need to fix only the misfits after that.
Ok, workspace, shortcuts, and basic adjustments are all set. We’re ready to start editing!
Read Part II. Batch Editing in Capture One Best Practices
Capture One Hidden Features eBook

Capture One Hidden Features is a collection of more than 200 pro hints to improve your Capture One workflow, structured into an easy-to-read book.
You can download four chapters from the Capture One Hidden Features ebook free of charge:
- 3. Must-Have Shortcuts
- 14. Hidden Features of Layers
- 27. The Power of Mask Inversion
- 38. Automation with Macros
Simply subscribe to the AlexOnRAW newsletter by entering your email in the form below. After subscribing to the newsletter, you’ll immediately receive the four chapters from the book. Also, you’ll regularly get a friendly newsletter with free Capture One tutorials, image editing tips and tricks, and news from Capture One community.